Quantcast
Channel: Mello Mike's Overland Adventures
Viewing all 66 articles
Browse latest View live

A Chevy Silverado Payload Warning

$
0
0
A few days ago, I received this surprising email from a brand new 2014 Chevy Silverado owner.

Hi, Mike. I am in the process of buying my first truck camper and have some info that might be of use to your readers. After carefully reviewing the specs, I bought a Chevy Silverado 2500HD 4x4 with a double cab (not a crew cab) and short bed. I purchased this primarily for the intention of going into the back country. My considerations included ground clearance, truck ratings, warranty, what would fit in my garage, and truck payload. With the 6.0L engine in the truck, Chevy’s website said that the truck could carry a payload of 3,379 pounds. Since we didn’t want a huge camper, this seemed fine.

We initially planned to buy an all-aluminum camper, but when we subsequently saw an Adventurer 86FB aluminum and fiberglass camper we liked it much better, and since it was only 2,380 pounds we thought we could easily do this. We ordered the Adventurer and were due to pick it up the following week.

I am the type of person who reads manuals, so I sat down to read the Chevy owner’s manual. It is tedious reading to say the least. In the middle of the manual I came across a section on truck campers. It said to check in the glove compartment of your truck to see what the camper capacity is. This seemed somewhat puzzling since the website made no mention of a separate camper capacity. When I checked the glovebox, I found that the capacity was only 2,014 lbs! I called the dealer, who did not believe me. When I went to see him, he pulled out a dealer sheet that says that the truck’s capacity is only 3,120 lbs for cargo, again with no mention of camper capacity. So Chevy lists three different carrying capacities for this vehicle. Nobody at my dealer knew about these discrepancies. The website has no information on the Silverado’s ability to carry a truck camper. The 2015 Silverado catalog, which was just released as a PDF, makes no mention either (the PDF can be viewed here). 

I am sure that the truck could easily handle the weight of the 2,380 pound camper, but I don’t want to buy it because, 1) if something goes wrong with the truck, Chevy will say I exceeded the payload, 2) if I have an accident, my insurance company won’t cover me because I violated the specs of the truck and, 3) if I have an accident and hurt someone, the plaintiff’s lawyers will have a field day.

Glovebox label showing the 2,014 lb truck camper payload.

The dealer called Chevrolet to try to get some further clarification on this matter. I have no gripes with my dealer, they tried to do their part. Today, after a second call to Chevrolet, the dealer was told that the consumer website was incorrect in the payload capacity for the truck and the dealer sheet was right, i.e., payload was 3,120 lbs. When the dealer questioned Chevrolet as to why the discrepancy in those two numbers, Chevrolet responded that their website was administered by a third party over whom they have no control.

When Chevrolet rates their camper capacity, they assume that you will have six adults in the cab, each weighing 150 lbs (900 lbs). So theoretically, since the only passengers in our truck would be myself and my wife, and our combined weight is less than 300 lbs, we could carry a camper weight of 2,014 + 600 lbs for a total of 2,614 lbs. That still only gives us 234 lbs (2,614 - 2,380 = 234) to load the camper with water, propane, food, and clothing. Not nearly enough capacity to carry the 86FB with water, dual propane tanks, food, etc.

I called Chevrolet and my call was escalated to a senior customer service adviser. September 25, 2014, will mark one week since I placed my call. Nobody has called me back.

I called Adventurer and spoke to one of their technical representatives who has been in the camper business for many years. He advised me that the truck manufacturers base their weight ratings for a camper on a truck that is placed closer to the tailgate, outside of the allowable location for the camper center of gravity.

Interestingly enough, Ford in 2014 published a Superduty Guide which specifically includes data on the truck camper capabilities of their trucks (the PDF can be viewed here). I have not been able to find anything like this on their 2015 models.

Ultimately, we have decided we will purchase a lighter truck camper, the Adventurer 80RB (1,720 lbs), which is also slightly smaller. Not our first choice.

You might want to pass this along to your readers who are thinking of buying a Silverado 2500HD. I strongly recommend looking in the glove compartment of any Chevrolet pickup you plan to buy to haul a truck camper to check the truck camper capacity. In GM’s Consumer Truck – Camper Loading Booklet, which my dealer got from Chevrolet after I started asking questions about the Camper rating), Chevrolet specifically does NOT recommend using a C/K Silverado 1500 crew cab for carrying a truck camper, nor a C/K Silverado 1500 with 20 inch wheels.

Also, you should know that while Chevy does offer a tow package, it does not include towing mirrors. You’ll have to purchase them separately.

I am sharing this information with you in the hopes that this will prevent any other prospective truck buyer from going through the frustration we have experienced.

Best regards,
Sad Steve

Wow! To say this is surprising would be an understatement. I've never heard of multiple payload listings for a pickup truck. I've owned both Ford and Ram pickup trucks and neither one was rated like this. Both had just a single payload rating. I'm not sure if multiple payload ratings is something new for Chevy or if this has long been their modus operandi. Regardless, I'm glad Steve let us know about this so others contemplating a Chevy Silverado purchase aren't caught by surprise. 

Mello Mike's Truck Camper FAQ

$
0
0
In the three years I've been blogging on this site, I've received a host of questions about trucks and truck campers and the myriad of choices that are out there for upgrading both. As you might expect, many of these questions have been identical or similar. Rather than repeat myself, I present these Frequently Asked Questions (FAQ). If you're reading these, you probably have a question of your own. Hopefully, it appears here. If it doesn't, please let me know and I'll add it.
  1. Which should I buy first, the pickup truck or the truck camper? If you're starting from scratch and have neither a truck nor a camper, it's best to buy your camper first. This will save you angst and money in the long run by allowing you to buy the right truck with the right amount of payload.
  2. What size pickup truck should I buy to haul my truck camper? I always recommend to my readers that they should buy a one-ton truck if they want to haul a truck camper. Why? Because one-ton trucks have the largest payload ratings and are equipped with the heavy duty suspension required to safely haul a truck camper. In the future, you may want to upgrade your camper to something larger. If you already own a one-ton, you can do this without having to buy a new truck. 
  3. Where on a truck can I find the truck's payload rating? The payload rating can either be found on a driver's side door pillar placard or in the glove box on a payload certification form. You can also determine the payload rating by subtracting the curb weight of the truck (you'll need to take it to the scales to get this figure) from the truck's GVWR.
  4. Why is the payload rating so important when choosing a pickup truck? The payload rating tells you how much weight your truck can safely haul without stressing the truck's frame, suspension, and tires. Basically, everything being carried in your truck, including all passengers, gear, and your "wet," fully loaded truck camper, should be below your truck's rated payload. Grossly exceeding the payload and GVWR is neither safe for your passengers nor for others who are sharing the road with you. And if you happen to get in an accident while overloaded, your insurance company can void out your coverage.
  5. Can I haul a truck camper on my half-ton pickup truck? It depends on what kind and how large of a truck camper you have in mind. Some long-bed half-ton trucks have an excellent payload, sometimes exceeding 3,000 lbs, while short-bed and mini short-bed models have smaller payloads generally less than 1,900 lbs. These smaller payloads basically limit you to pop-up truck campers and smaller hard-slide campers for short-bed trucks, and pop-up truck campers for the minis. In most cases, you'll need to upgrade the standard Passenger tires with a good Light Truck tire and make several upgrades to the truck's weak suspension.
  6. What kind of tires should I buy to safely haul a truck camper?At a minimum you'll need a quality Light Truck (LT) tire with a Load Range of E. If you're hauling a heavy, long-bed truck camper with one or more slide outs you may want to buy 19.5 inch Load Range H tires for greater weight capacity. When shopping for your tires make sure you buy a tire with the required weight capacity to safely haul your truck camper.
  7. I just took my truck and my brand new truck camper to a local CAT scale and my combo exceeds my truck's payload by 1,000 lbs. What should I do? Buy a truck with a bigger payload. If you can't buy a bigger truck then I would buy new tires with a larger weight capacity. Grossly exceeding your payload is a bad idea. Grossly exceeding the weight rating of your tires is foolish and can be deadly. 
  8. What is a truck camper's Center of Gravity (COG) and why is it so important? Every camper has a COG which identifies where along the length of the camper the weight is centered. Ideally, the camper's COG needs to be in front of your truck's rear axle. Most campers have a sticker identifying where the COG is located. You never want to have the COG behind your rear axle, especially with large and heavy campers, because this may impair your truck's handling.
  9. How can you determine if a truck camper's Center of Gravity is bad or off? Verifying that your COG is good is fairly easy and will require a couple trips to the scales with and without your camper. If your front axle weighs less with your truck camper on your truck then your COG is "off." You can usually correct this by reloading your camper, ensuring that most of the weight is in front of your rear axle.
  10. What equipment do I need to secure my truck camper to my truck? You will need four truck camper tie downs and four turnbuckles. The tie downs are mounted to the truck's frame while the turnbuckles act as the "middleman," securing the truck camper to the truck. There are basically two tie down systems from which to choose: Torklift and HappiJac. I prefer the Torklift frame-mounted tie down system, but that's my personal preference. Check with your truck camper manufacturer to see which system they recommend. As for the turnbuckles, you will want to buy quality spring-loaded turnbuckles, like the Torklift Fastguns, as these have the right amount of give when overstressed. For an in-depth review of the Torklift FastGun, check out my review here.
  11. How tight or snug should my turnbuckles be when attaching them to my truck camper? The turnbuckles should be snug only, don't go medieval on them. If you are using excessive strength to clamp them down then they're too tight and may damage your truck camper. Refer to the instruction manual that came with your turnbuckles if you are in doubt. 
  12. Do I need a rubber bed mat to haul a truck camper? Personally, I think they're a must. The mat not only protects your truck bed or bed liner from being scratched, but also prevents your truck camper from sliding around while driving your truck. You can buy specially made mats for the specific make and model of your truck or you can go cheap and buy generic anti-fatigue floor mats like those sold at the big box stores. Having tried both, I prefer the former. These fit better and prevent your camper from sliding around better than generic mats.
  13. How can I correct rear sag when my truck camper is mounted to my truck? The most common remedies for rear sag include extra leaf springs, Torklift Stableloads, and air bags. Of these, adding another leaf spring is probably your best bet as they provide a much better ride and much improved spring travel compared to a truck with Stableloads or a large overload spring. Stableloads, however, are an effective modification, too. By engaging the overload spring sooner, they not only prevent sag, but they can also prevent sway and improve control. If you do decide on Stableloads, I recommend the quick disconnect version as they can be engaged or disengaged in a matter of seconds. Air bags are another popular option. They're easy to use, adjustable, and are great for side-to-side loading when one side is lower than the other, but they can also can create too much roll when they are overfilled and aren't particularly suitable for off-road use.
  14. How can I correct sway when hauling my truck camper? For those who are experiencing excessive sway or a tipping sensation on turns you can try the aforementioned Torklift Stableloads or a sway bar like the Hellwig Big Wig. Both are excellent products, but work differently. Stableloads work with the leaf springs to engage the overload springs sooner while the sway bar works with the axle and frame of the truck to keep the truck level. Most of the 3/4 and one-ton trucks coming off of today's assembly lines come with a front sway bar only, but many find that a rear sway bar is also needed for added stability and handling when hauling a truck camper. Some truck owners have even replaced the front OEM sway bar with a beefier aftermarket sway bar and have seen a noticeable improvement in handling. For an in-depth review of the Hellwig Big Wig, click here.
  15. I own an F-250 pickup truck with a 2,500 lb payload and would like to buy a 4,500 lb camper. Can't I just add additional leaf springs, Torklift Stableloads, 19.5 inch tires, and a rear sway bar to haul it? You can, but I wouldn't. If you do you'll neither be safe when the weather's bad nor will you be legal if you get in an accident. The lawyers will have a field day with you and will take everything you've got if you injure their client. Is it really worth the risk on a recreational outing? Nope!
  16. Can I tow a boat or Jeep when hauling a truck camper? Absolutely! The ability to tow is one of the great things about owning a truck camper. An important thing to keep in mind when towing, however, is that the tongue weight of the trailer must be factored in against the truck's rated payload. If you want to tow, you might need a hitch box extension since many truck campers extend anywhere from 18 to 24 inches from the rear of the truck. Available in different lengths, a hitch box extension is simply a metal tube that fits into a standard hitch receiver.
  17. Can I put a long-bed truck camper on a short-bed truck? In most cases, no. However, some manufacturers produce both short and long-bed versions of the same model camper like Northwood Manufacturing's Wolf Creek 850. In this case, you could put a long-bed model on the short-bed truck, but you lose the benefits of the side storage boxes found on the short-bed models.
  18. Can I put a short-bed truck camper on a long-bed truck? Yes. This is usually done by truck camper owners so that the front of the truck bed can be used for storage.
  19. Do I need to remove my truck's tailgate before mounting my camper? In most cases, yes. Any camper that extends beyond the truck's bed will require removal of the tailgate.   
  20. Is it true that some states don't require truck campers to be registered? Yes, that's true! A total of 39 states still classify the truck camper as cargo rather than an RV. That means if you live in those states you won't have to pay annual license and registration fees like you would with other types of RVs.
  21. Why do truck campers make such great RVs? Because they're versatile, easy to drive, maneuverable, and can be taken far off the beaten path. They're also cheaper to own, easier to maintain, and provide better fuel economy than other types of RVs. To learn more about the benefits of truck camper ownership, click here.
  22. Where should I go to learn more about truck campers? This site has loads of unbiased information about truck campers. There is also an internet forum on RV.NET where you interact with other truck camper owners.

Torklift Talons Installation Report and Review

$
0
0
I just finished installing a complete set of Torklift Talons on my truck. What are Talons? Well, if you're familiar with Torklift International's frame mounted tie down system for truck campers, Talons are simply the aluminum version of the same system. In fact, aside from the lightweight, military grade aluminum from which they're made and the color and shape of the tie down inserts (the Talon inserts are powder coated silver not black), there are very few differences between the two products.

Why buy a set of Talons when you can buy a set of the classic steel tie downs for less? Well, the fact that they're made of aluminum means they're lighter, about 30 lbs less than the steel version (Torklift told me that each receiver and insert together weigh 7-8 lbs less). When it comes to truck campers, every pound matters, especially when your truck camper combo is pushing or exceeds your truck's GVWR. Another big benefit of the Talons' aluminum construction is that they won't rust--no need to clean and paint them on an annual basis to keep them protected and looking good. The only real negative with the Torklift Talons is the cost--you'll spend a good $120 more for a complete set compared to the original steel tie downs.

The complete Talon truck camper tie down system comes with four removable aluminum inserts, four aluminum frame mounted receivers that work similar to trailer hitch receiver, mounting hardware, and four finishing kit covers to protect the receiver tubes when the inserts aren't installed (note that the Talons are sold in pairs, two for the front and two for the back). Like all Torklift products, the Talon truck camper tie down system comes with Torklift's legendary lifetime warranty. Better yet, they're proudly made in the USA. If you're like me, this is important. Anytime I can help keep an American worker stay employed, I'm going to do it. Even if it means I have to pay a little more to do it. The typical cost for a pair of Talons is $325 on the Internet. For my 2013 Ram 3500, I installed kit D2123A for the front and kit D3109A for the rear.

Steel tie down insert (left) and Talon insert (right)

Installing the Talon tie down receivers was easy. No drilling is necessary. Just bolt them on by using existing holes in the frame and mounting points on the suspension. If you've installed the classic Torklift tie downs before, then you'll have no problem installing the Talons. Indeed, the installation of the Talons for my truck was identical with the two systems using the same exact installation hardware. The only real difference between the two is that the front Talon receivers use only one vertical hook bracket rather than two. The installation time was quick, about 20 minutes each for the rear tie down receivers and 30 minutes for the front receivers. Oh, and in case you're wondering. The Talon inserts are a bit too large to fit in the classic steel tie down receivers.

Like any job, having the right tools will make the job go much quicker and easier. For the front receivers you'll need a standard 3/4 inch wrench and a socket wrench with a 3/4 inch head attached to an 10 inch extension. The wrench extension is a must to tighten the nut to the vertical hook brackets. You'll need the same tools for the rear receivers including the extensions. You'll also need a 15/16 inch socket head to remove and reinstall the factory bolts for the rear tie downs. Lastly, a torque wrench is needed to tighten all nuts to the required 40 ft pounds.

Taken as a whole, the front receivers were more difficult to install than the rear ones. Part of the difficulty lies in the tight confines where the front receivers are located. Elbow room is lacking. The receivers are mounted over the front leaf spring perch mount. Each tie down receiver has a large hole which is placed over the large bolt head shown in the picture below. The vertical hook bracket is used to install the top of the receiver while the mid-section is secured using a metal clamp strap. Due to the height and difficult angle, you may have some difficulty lining up the hook bracket with the hole at the top of the receiver. Keep at it if you're having trouble moving the hook bracket, it will move, you just have to get it at the right angle to slide around.

The front receivers are mounted here on the perch mount.

The clamp strap was much easier to reach and install. The strap, which has a dog-leg shape, was installed just above and behind the perch mount bolt shown in the picture above. Unfortunately, I found that one side of the strap doesn't sit perfectly flush due to the radius edge on one side of the perch mount opening (see the small opening to the right of the large bolt in the photo above). Torklift confirmed that this isn't a problem as long as the nut is tightened to specs. If you look at the picture below you'll notice the slight off-angle of one of the installed bolts. The only complaint I have with this portion of the install is that the bolts used for the clamp strap are too short, they need to be at least a 1/2 inch longer. Each front receiver took a little over 30 minutes to install with an extra set of hands to help.

View of front Talon receiver.

Torklift's instructions state that you should hand tighten the nuts first before tightening everything up to 40 ft pounds. It's important that you do this to allow a little play in the receiver to get the alignment of the receiver just right. Though the directions don't specifically say, I recommend tightening the clamp strap nuts first before moving on to the hook bracket nut at the top of the receiver. Alignment of the clamp strap is crucial as there isn't much wiggle room to allow sufficient clearance of the bolts. Even after getting the alignment right, however, I still found that the Talon front receiver tubes were tilted forward just a bit. Torklift confirmed that this isn't a problem and is quite normal for this particular installation (the steel Torklift receivers have this same quirk).

Compared to the front, the Talon rear receivers were extremely easy to install. Everything was easy to reach and get to and the instructions were clear and well-written on what needed to be done. You'll use three existing factory bolts as well as a supplied two-inch long bolt for each rear receiver. No issues were encountered installing these though I did need a hollow bar over the socket wrench handle to get sufficient leverage to loosen the factory bolts. These were very tight and difficult to budge. Each rear receiver took only about 20 minutes to install.

Closeup of an installed Talon insert. 
Torklift finishing covers come with the installation kit.

Overall, this was a quick and easy installation. One person can easily perform this installation though at times another person is useful to hold the receivers into place and to help tighten the nuts. Out of curiosity, I called several hitch shops here in the Phoenix/Mesa area to see what they would charge to install these and the quotes I received varied between $150 and $300 dollars. If you have the inclination and know-how, I recommend you do the installation yourself. If you don't, then you'll probably pay a hefty price for what I consider to be a fairly easy installation.

So is the Talon aluminum-made tie down system worth the extra cost over Torklift's classic steel tie down system? That's up to you to decide. In my opinion, the tie downs are worth the extra cost on the basis of being rust free alone. The fact that they weigh less is just icing on the cake. So if you're looking for a lightweight, tried and true frame mounted tie down system that doesn't require drilling holes into your truck bed and your rear bumper, then get a set of Torklift Talons. You won't regret it.

Note: I am an independent reviewer. I do NOT get paid to review products on this website. I will only recommend products in which I believe and which I think will benefit my audience. The views expressed in my reviews are personal views and are written without any influence, whatsoever. That said, I reserve the right to engage in paid affiliate marketing and promotion with brands, companies and individuals whose products I review. 

Tire Pressure: Getting It Right

$
0
0
Few things are more important to the safety of your family and your truck than your tires. The trouble is, there is a lot of misinformation and complacency out there. Few people really know the proper tire pressures required and even fewer people check them on a regular basis. First off, let me say I'm no expert. I neither design nor sell tires for a living. But I do have a lifetime of experience with them, having owned over a dozen trucks and travel trailers, and having read numerous publications and articles on how to properly inflate and care for them. It's hoped that this article will spark interest on tire safety and serve as a gentle reminder on the importance of periodic inspections.

Without a doubt, improper inflation is the greatest cause of tire damage and failure. Indeed, driving on an over- or under-inflated tire is dangerous and can lead to a tire overheating and bursting. If you've ever suffered a blowout at highway speed, you know how dangerous it can be. Moreover, an over- or under-inflated tire can experience excessive tread wear thus leading to the reduced life of the tire. Not only that, but driving on an under-inflated tire can also increase the rolling resistance, leading to reduced fuel economy. With the price of fuel being what it is today, every mile counts. With the high cost of fuel some owners like to over-inflate their tires to decrease rolling resistance. But the benefit of greater fuel economy is offset by the greater risk of suffering a major blowout (not to mention a rougher ride). It simply isn't worth the extra risk.

There are two basic approaches you can take on proper tire inflation. The first is to use the inflation values recommended by your truck manufacturer. These values can be found either on a placard located on the driver's side doorjamb or in your owner's manual. The placard for my Ram 3500 calls for my Firestone 275/70R18E front tires to be inflated to 60 psi and the rear tires to 80 psi. It's important to understand that the inflation values on the placard assume a maximum payload, which is why 80 psi is required for the rear tires. The second approach varies both the front and rear pressures based upon the combined weight of your truck and truck camper. For this approach, you'll need to take your truck and truck camper to the scales to get weighed then refer to your tire manufacturer's tire inflation chart and inflate accordingly. The Firestone tire inflation chart for Medium Truck (MT) and Light Truck (LT) tires can be viewed by clicking here. When using these tables remember to multiply the listed values by two if you're going by the actual weights for each axle of your truck.

Doorjamb tire and loading placard for a 2013 Ram 3500. 
 
Which approach is best? The Tire Industry Association's website recommends the first though the second works well, too. Which do I actually prefer? I prefer to use the first approach since my truck camper comes close to maxing out my truck's payload rating, though when unloaded I do like to air down my rear tires to 50 psi so my ride is smoother and less harsh. And for those who are curious, if I were to use the second approach with my camper mounted, I would put 50 psi in my front tires and 70 psi in the rear tires. As you can see, the differences between the two approaches are pretty minimal, so I prefer to go with the slightly higher inflation values strictly for the better fuel economy. The bottom line is that you can't go wrong using either approach. They're both right, though many feel more comfortable staying with the truck manufactures' suggested inflation values.

There are a few things you need to keep in mind when checking your tires. First, always measure a tire's pressure when it's cold. What is a "cold" tire? It's a tire that has been driven on less than one mile and a tire that hasn't been sitting in the hot afternoon sun. This is important because driving at high speeds in the heat of the afternoon sun can raise a tire's pressure as much as 6 psi. Because of this I like to check and fill my tires first thing in the morning when it's the coolest. When filling, never exceed the maximum psi value listed on the tire's sidewall. Load Range E tires, those typically found on 3/4 and one-ton pickup trucks, have a maximum pressure of 80 psi. Oh, and when checking your tires, don't forget to check the spare. That's a common mistake.

The maximum tire pressure brings up a good point and a common mistake made by some newbies. As we just discussed, a tire driven at high speed can see an increase as much as 6 psi. For a Load Range E tire recently filled at the maximum pressure of 80 psi cold, this means you could see a reading as high as 86 psi immediately after returning from a road trip. This is nothing to be alarmed about. Tires are engineered to handle the extra heat and corresponding rise in pressure that driving at high speed naturally causes. This extra "hot" tire pressure is perfectly normal and doesn't need to be bled off. Doing so is a common mistake made my newbies. Don't fall for it. Compensating may result in under-inflation. Besides, tire pressures are to be taken cold, not after returning from a long road trip.

Even over inflation can cause catastrophic failures like this.

How often should you check your tire pressures? I like to check mine before each getaway with the camper and each time before I go to the fuel pump. It's important to check your pressures regularly due to a process called permeation. Tires lose air normally through this process, but changes in temperature can affect the rate at which your tire loses air. This change is accelerated in hot weather though a tire can still lose one or two pounds of air per month during the winter. When checking your tires, make sure all of the valve stems are equipped with valve caps to keep out dirt and moisture. This is especially important if you like to drive off-road. Oh, and speaking of valve stems, always make sure that your LT tires are equipped with metal stems to handle the higher pressures. Believe it or not, some tire shops are guilty of making this mistake.

No doubt you've heard some good things about the use of nitrogen in tires. Proponents claim that nitrogen is denser than air and less prone to permeation thus enabling a tire to stay properly inflated longer. This, they say, leads to better fuel mileage and less wear and tear on your tires. Yes, the claim is true, but the cost for nitrogen--anywhere between $5-12 per tire--far outweighs any benefits derived from the gas. Now if it was free, I'd certainly use it, but it isn't. In my opinion, nitrogen is just a scam, another way to fleece the public. Those who claim otherwise are usually those with a vested financial interest in the subject. Remember that.

Lastly, since we're on the topic of tire care, it's important for all truck and motorhome owners to carry both a tire repair kit, like the Safety Seal Pro Tire Repair Kit, and a portable air compressor, like the VIAIR 450P Portable 12 volt Air Compressor. Many RV owners, like myself, like to boondock and travel far off the beaten path. Having these with you gives peace of mind knowing you can repair a leak and air up your tires at any time. These items, of course, should be part of a well-stocked emergency roadside kit, a kit that every vehicle owner should own.

My New Buckstop Classic III Winch Bumper and Warn 16.5ti Heavy Duty Winch

$
0
0
Well, it's finally here! After waiting ten long, excruciating weeks, I finally received my Buckstop Classic III winch bumper. Along with the bumper, I installed two PIAA 520 ATP head lamps and a Warn 16.5ti heavy duty winch. With several choices in colors, I opted for the black, hammer tone finish. It looks pretty sweet if I do say so myself.

Being a hands-on kind of guy, I usually like to install things like this myself, but with the weight of the bumper (over 190 lbs), I opted to have the folks at Desert Rat here in Mesa install it for me. The entire project took one person eight hours to complete. I have to say I was pretty impressed with the quality and professionalism of their work. They did an outstanding job. And in case anybody is wondering, yes, they had to remove the front two tires to give sufficient access to install the bumper from the backside.

For those unfamiliar with Buckstop Truckware, the company is based out of Prineville, Oregon. Buckstop is a true American company. All of their bumpers are made in the USA. The company makes heavy duty front and rear bumpers for large and small trucks of all makes, including Ford, Chevy, Dodge, GMC, Nissan, and Toyota. As the name implies, Buckstop bumpers are meant to stop a large buck from damaging the front end of your truck. Their winch bumpers come with an impressive array of standard features including a heavy duty grill/brush guard, a fully enclosed winch area with a winch access cover door, two Frenched light buckets, a 2-inch trailer receiver, and a license plate bracket. The Classic III is a new offering for 3/4- and one-ton trucks, and as of this writing, still isn't listed on their website though it is for 1/2-ton trucks. If you're interested in buying one, talk to Dorian. He'll get you set-up.

What really sold me on a Buckstop bumper is the quality construction. Their bumpers are made with 1/4-inch steel in the primary impact zone and winch center and 3/16-inch steel under the headlights. The 190 lb bumper is stout enough to house a winch with a rated line pull of 16,500 lbs with the standard 4.5-inch x 10-inch bolt pattern. This pattern will accommodate most winches available in the market today. The grill/brush guard is made of 2.5-inch circumference tubular steel to protect the front end from high impact strikes. Better yet, the grill/brush guard is removable, perfect for those times when you need to service the radiator or grill on the truck or the grill/brush guard on the bumper.


A key feature of the Buckstop winch bumper, and a big selling point for me, is the winch access door (you'd be surprised at how winch bumpers didn't have one). This door protects the winch from the weather and elements and permits easy access for winching operations and maintenance. The door lifts up by first twisting the locking tab. The door is pretty heavy, too. It weighs a good 10 lbs.

As for the Warn 16.5ti, it's pretty sweet! It's Warn's highest capacity, most technologically advanced winch. The series-wound motor combined with a 3-stage planetary geartrain delivers a whopping 16,500 lbs of pulling power. The aluminum control box coupled with the winch's extreme-duty sealing helps protect the winch's sensitive electronics from the outside elements. This was a key feature I really wanted. The remote control also features a thermometric indicator LED that provides operator feedback on motor temperature. Like the Buckstop bumper, the Warn 16.5ti winch is made in America (unlike most of the winches being sold today). The winch is also backed by the Warn limited lifetime warranty. The winch comes with 90 ft of 7/16-inch diameter wire rope, but I'll be switching this out with synthetic rope in a few months. The weight of the Warn 16.5ti is 138 lbs.

For those wondering about the logistics of this project, here are a few details. The estimated time for delivery of the bumper was six weeks, but it took ten. Evidently, the delay was due to Buckstop's recent relocation. The delay was disappointing, but for me the quality is more important. I don't mind waiting if I receive a quality product that was well packaged and shipped to my satisfaction. Oh, and speaking of the shipping, the company offers a flat rate fee of $75 if you ship with Buckstop's preferred carrier, Old Dominion shipping. The shipment took three days to arrive from the factory in Prineville, OR to Old Dominion's warehouse in Phoenix, AZ. Old Dominion doesn't home deliver, so you have to pick the bumper up in person.

Does my new Buckstop bumper mean I'm immune to damage from deer and elk? No, but it does reduce the chances, substantially. If your truck is like mine, your front grill is made of plastic, not much protection for the radiator if you happen to hit a buck at 45 mph. The last thing I want happening on an outing is to be disabled in the middle of nowhere, beyond cell range. In that regard, my new Buckstop bumper offers me greater peace of mind knowing my radiator is protected from whatever may come my way. And with my new Warn winch, I now have to ability to help myself and others who may be stuck and beyond the call for help. 

A Quartzsite Boondocking Primer

$
0
0
Quartzsite, AZ is probably unlike any other place on earth. During the summer months, the sleepy little desert town looks like hundreds of others you may encounter in the desert southwest. However, a complete transformation of the town takes place in late Fall as hundreds of thousands of Recreational Vehicles (RVs) and their owners migrate to the area to boondock over the winter. This massive migration increases the population of Quartzsite from 3,300 to well over half a million. Seeing hundreds of thousands of RVs camped in the desert is a pretty amazing sight to behold the first time you gaze upon it. It's pretty neat.

Due to the massive influx of RVs each Fall, the "Q," as the town is affectionately called, is known as the Boondocking Capital of the World. You may be asking, "why Quartzsite?" That's a great question. There's nothing really special about the town. It's actually kind of ugly. It's where the town is located that makes it special. First, the town is easy to get to as it's located on the I-10, an important interstate linking the major cities of Los Angeles and Phoenix. Two, the town is surrounded by enormous plots of federal public land where free camping is not only allowed, but it's practically encouraged. Third, due to the elevation and southern latitude, the weather in town during the winter months is darn near perfect with daytime temperatures consistently in the 60s and 70s. These facets combine to make Quartzsite an ideal location for a low-cost, winter retreat.

View of Quartzsite heading east on the I-10.

Before discussing the public lands around Quartzsite it will help to know more about the geography of the area, not to mention where some of the camping areas get their names. At an elevation of 879 ft, Quartzsite lies on the western portion of the La Posa Plain and is nearly surrounded by mountains. The Dome Rock Mountains overlook the town on the west with Granite Mountain located to the southwest and Oldman Mountain located to the northwest. The Plomosa Mountains lie across the La Posa plain to the east. Quartzsite receives very little rainfall, just four inches per year, and enjoys very moderate temperatures, between November and April, and triple-digit temperatures, from June through September. The area is also prone to high winds and dust storms year round, especially in late summer and in the fall.

The Bureau of Land Management (BLM) has set aside six areas for dispersed camping or boondocking around Quartzsite. The largest area, called the La Posa Long-Term Visitor Area (LTVA), is located just south of town off the US-95. To boondock there you must purchase either a $40 permit for two-weeks or a $180 permit for seven months (September to April). This fee includes garbage, potable water, and dump station access. The remaining five BLM camping areas, strategically located around town, are completely free, but the stays at these locations are limited to 14-days. The Plomosa and Hi Jolly areas are located a short distance north of town off the US-95, while the Scaddan Wash, Dome Rock, and Roadrunner BLM areas are located south of the I-10. For those not staying at the La Posa LTVA, a few locations in town, like The Pit Stop, provide water, sewer, and garbage services. Trucks providing mobile sewer and water services are available as well.

A basic map outline of the Quartzsite BLM camping areas.

Finding the entrance to each BLM camping area is pretty easy. Each is well marked with a small sign, though the areas are large enough that several entrances can be found for each. With the exception of Dome Rock, each area is relatively flat and will accommodate all sizes and types of RVs. Washes, however, cut through some of the areas, so you may need an RV with a decent clearance to traverse some of them. While the surfaces around Quartzsite are fairly level, it's also advisable to have some kind of leveling system or blocks to level out your RV. Directions to each camping area are provided below:
  • Plomosa Road: Located about 5.5 miles north of Quartzsite on the north and south sides of Plomosa Road. Take AZ-95 north from Quartzsite to the Plomosa Road turnoff and turn right.
  • Hi Jolly: Located about three miles north of Quartzsite. Take AZ-95 North from Quartzsite to mile Marker 112 and turn right at the entrance
  • Dome Rock: Located about six miles West of Quartzsite. Take I-10 West from Quartzsite to the Dome Rock exit. The camping area is south of the I-10.
  • Scaddan Wash: Located about 3.5 miles East of Quartzsite. Take the I-10 frontage road from the Mile Marker 19 Exit East. The camping area is south of the frontage road.
  • Road Runner: Located about five milessouth of Quartzsite. Take AZ-95 South from Quartzsite to Mile Marker99. The camping area is west of AZ-95 between the gas line road and La Paz Valley Road.
  • La Posa LTVA: Located less than one mile south of Quartzsite. Take AZ-95 south of Quartzsite to the brown brick Contact Station at the entrance to each section. The camping area has four sections: La Posa North, La Posa West, La Posa South, and La Posa Tyson Wash.

Boondocking at Scaddan Wash.
The rules and regulations for boondocking on public lands are pretty limited, but are very important. If you plan on boondocking in a BLM camping area for 14 days, you're required to sign in with the area host first. Signing in, however, is not required if you plan on staying for just a single night. Leaving behind garbage or dumping the black or gray water tanks while camping is strictly prohibited. The Bureau of Land Management website reminds RV owners to take care of the public lands like they are our own. That's a great reminder because they are. All too often inconsiderate RV owners leave behind their garbage after spending a week camping. It's not a big problem around Quartzsite, but it is in less used public areas in Arizona.

While the camping regulations are limited, you should observe the Golden Rule while you boondock. Respect the privacy of others and don't park too close to other RVs unless you're with family or close friends. Most areas have plenty of space to accommodate your RV, so there's no need to park like you're at a NASCAR race. And if you must run a generator run it during daylight hours only, and use one of the whisper quiet inverter generators rather than a teeth-rattling industrial type. Few things irk RVers more than hearing a generator run all day. If you observe these few simple rules you and your neighbors will enjoy a much more pleasant stay in Quartzsite.

My Philosophy on Suspension Upgrades and Tires

$
0
0
Most people know how critical wheels and tires are to truck handling and safety, but the truck's suspension system is important, too. The suspension system consists of coil springs and leaf springs as well as shock absorbers and linkages that connects the chassis to the axles and wheels. All combined these components directly contribute to a truck's handling and braking and play a major role in driving pleasure and comfort. This article will take a closer look at these components and will discuss the hardware used to modify these in order to improve performance and handling for those hauling a truck camper.

For those buying a new truck and truck camper, my philosophy on suspension upgrades is simple. It's best to first drive your truck with your camper mounted to see how the truck handles before spending any money on upgrades. Otherwise, you may waste a lot of money on hardware you really didn't need. I see this happen all the time. Based upon the opinion of friends and what they've read on Internet forums, new truck owners will immediately shell out big bucks on new shocks, air bags, sway bars, and Stableloads before even buying or taking a test drive with their truck camper. This is backwards. It's best to first see how your truck handles under load and treat each symptom that you encounter with the correct suspension modification. Moreover, only one modification should be made at a time to determine its true effectiveness.

If you find that your truck sags too much in the rear with your camper mounted you'll need to correct that. The most common remedies for rear sag include leaf springs, Torklift Stableloads, and air bags. Of these, adding another leaf spring is probably your best bet as they provide a much better ride and much improved spring travel compared to a truck with Stableloads or a large overload spring. Stableloads, however, are an effective modification, too. By engaging the overload spring sooner, they not only prevent sag, but they also prevent sway and improve control. If you do decide on Stableloads, I recommend the quick disconnect version as they can be engaged or disengaged in a matter of seconds. The last viable option to correct rear sag are Air bags. They're easy to use, adjustable, and are great for side-to-side loading when one side is lower than the other. If you aren't careful, however,  they can also can create too much roll if they are overfilled and aren't particularly suitable for off-road use.

A Firestone Ride Rite Air Bag.

The shocks that came with your truck may or may not be up to the task of carrying the extra weight of a truck camper. The dampening effect of your shocks is important in how well your truck and camper rides when going over rough and uneven roads and terrain. Shock absorbers comes in two basic forms: self-adjusting or manual. Self-adjusting shocks, like Bilsteins or KYBs, do exactly that, they adjust based upon the force asserted each time they're depressed. Manually adjusted shocks, such as the Rancho 9000, allow you to change how much dampening is applied based upon the weight you are carrying. The adjustment can be made either on the shocks themselves, the cheaper option, or within the cab with a spendy remote unit. The pros and cons of each are pretty obvious, it comes down to personal preference and cost.

For those who are experiencing excessive sway or excessive lean on turns you can try the aforementioned Stableloads or a anti-sway bar like the Hellwig Big Wig. Both are excellent products, but work differently. Stableloads work with the leaf springs to engage the overload springs sooner while the anti-sway bar works with the axle and frame of the truck to keep the truck even keeled. Most of the three-quarter and one-ton trucks coming off of today's assembly lines come with a front sway bar, but many find that a rear sway bar is also needed for added stability when hauling a truck camper. Some truck owners have even replaced the front OEM sway bar with a beefier aftermarket sway bar.

Your pickup truck will be bearing all of the weight of your truck camper, so you'll want to make sure your tires are up to the job. If you plan on hauling a truck camper, you'll generally want tires with at least a Load Range rating of E. However, not all Load Range E tires are created equal. Sizes and weight ratings differ so you'll want to ensure that the tires you're looking at can handle not only the weight of your truck, but also the weight of your truck camper. And if you're upgrading your tires, you should also seek additional load capacity over the OEM ratings. Keep in mind that the weight on the rear axle is evenly divided by each tire, so an axle rated at 6,200 lbs will come with tires rated for 3,100 lbs. The maximum inflation value for Load Range E tires is 80 psi.

Proper inflation can avoid catastrophic failures.

Proper inflation of your tires is vital--check them regularly. Refer to the tire inflation placard located on your truck's doorjamb to determine the correct inflation values for your tires. For example, the placard for my 2013 Ram 3500 truck with LT275/70R18E tires calls for 60 psi for the front tires and 80 psi for the rear. These values are for hauling the maximum payload of the truck, so the tire pressure in the rear can be lowered if you're hauling less that the maximum payload or nothing at all. Make sure you check your tires regularly for abnormal wear and proper inflation, especially before leaving on each trip. As for the size of the tires, that's a personal choice. Those who haul around long-bed truck campers, the heaviest campers on the market, swear by 19.5 inch tires (Load Range H) because of the stiffer sidewalls and how well they handle with the extra weight.

Ram 3500 doorjamb placard with axle ratings and tire info.

As for the type of tires to put on your pickup truck, it depends on where you live, the kind of roads on which you travel, and where you like to camp. If you live in an area where winter ice and snow are the norm, you'll want to have a good set of stud-less snow tires to provide the traction you'll need. However, if you live in a temperate climate and plan on doing primarily highway driving, then a good set of all-season (A/S) highway tires will be more than sufficient. Another great option is a quality set of all-terrain (A/T) tires. These work well for both highway driving in all conditions as well as off-road travel and are an excellent alternative for those who don't want to bother with a specialized tire. As for my favorite brands, I really don't have one. Over the years I have purchased all-terrain tires from several manufacturers, including BF Goodrich, Firestone, Toyo, and Michelin, and have liked them all and got excellent service out of each.


Boondocking on the Apache Trail

$
0
0
The Apache Trail, located in the heart of central Arizona, is known for its breathtaking beauty, but for those who enjoy outdoor recreation, like boating, fishing, and hiking, it's also a first-rate attraction. The trail itself is one of Arizona's best and has been designated a USFS Scenic Byway. I've driven the Apache Trail four times, but I've never had at opportunity to do some serious boondocking and fishing along it until last weekend.

Fish Creek Canyon is one of my favorite areas. The steep, copper-colored canyon walls and jutting peaks provide a spectacular backdrop. The creek, unfortunately, flows only during rain storms, but the amount of rain is enough to water the sycamore and cottonwood trees that line the creek. The big, leaf bearing trees provide a stark contrast with ubiquitous Saguaros and Ocatillo seen throughout the Sonora Desert. The trail that passes along Fish Creek is a dirt and gravel surface. Since the creek can be filled quickly after a rain, two large, single-lane bridges have been constructed to provide year-round access. 

Fish Creek Canyon has two established sites where you can boondock. Neither one is developed. You won't even find a fire ring though there was evidence of a recent campfire where we were camped. November is a great time to explore the Apache Trail. The weather while we boondocked was darn near perfect. A high of 80 degrees during the day and a low of 59 at night, perfect sleeping weather. While were were camped we were fortunate to have a full moon which bathed the canyon in an eerie yet spectacular glow during the night. Cell reception? Not down in this deep canyon, though you will find 3G service further east near the Apache Lake Marina and 4G service at Roosevelt Lake.

View of our campsite facing north.
View outside our window.
Near dawn facing northeast.
Closeup of the camper facing east.
Fish Creek further east.
 

Weekend on Apache Lake

$
0
0
We spent last weekend at Apache Lake, dry camping at the Burnt Corral USFS campground. As you probably already know, I'm not a big fan of campgrounds, in fact I hate them. But occasionally I come across a gem that is well-priced and that is located in a spot that's simply hard to beat. The Burnt Corral Campground, located six miles southwest of the Roosevelt Dam on the historic Arizona Apache Trail (AZ-88), is one such spot.

The Burnt Corral Campground consists of 79 mostly level sites. Like most USFS campgrounds, you can't make reservations, it's first come, first served. Each graveled site consists of a picnic table and a metal fire ring with attached grill. The best camping sites are located right on the lake, and naturally, these go first, so get there early in the day if you want one. You won't find full hookups at this USFS campground, but if you have a solar powered camper like mine, who needs them. Besides the location, the best thing about the Burnt Corral Campground is that it only costs $6 a night to stay there (for seniors, it's only $3 a night). Be warned. The campground host doesn't take cash. You'll need to purchase a Tonto National Forest day use pass as one of their offices or at an authorized seller (we bought ours at a local gas station here in Mesa).

The Burnt Corral Campground is open year round, but because of the 1,900 ft elevation, it's simply too hot to camp there from June to September. The best time to stay there is during the spring, winter, and fall. Last week, the temperatures were darn near perfect with a high of 82 degrees during the day and low of 56 during the night, perfect sleeping weather. Because of it's remote location, and because few people know about the campground, you'll rarely find the campground full. In fact, when we were there last weekend, I'd say only 20-25 sites were being used. For a guy who hates campground noise and the lack of privacy, this is a good thing. The fewer the people the better.


View of the lake from our campsite.
View of the lake at dusk.
Yours truly hoping to land the big one.

If you like boating and fishing, you'll love the Burnt Corral Campground. The campground features a large concrete boat ramp and a small pier. When we were there I'd say half the folks staying at the campground had fishing boats while the other half had kayaks and canoes. Apache lake is stocked with rainbow trout during the spring and winter and you'll find plenty of large and small mouth bass in the lake, too. In fact, the Saturday we were there, a large bass fishing tournament was being held on the lake. Unfortunately, I didn't have a boat and had to fish from the shore. No, I didn't catch anything. Next time, I'll come prepared to fish for bass rather than trout.

The stay limit at the Burnt Corral Campground is 14 days. The campground policy is to pack it in, pack it out, though the campground provides several well-placed dumpsters where you can dump your trash. There are numerous water spigots located throughout the campground and a few pit toilets. Unfortunately, there is no dump station, but you can find one not too far at the nearby Roosevelt Lake campgrounds eight miles east on AZ-188. Because the Apache Trail is a narrow, winding mountain road, the maximum vehicle length limit is 40 ft with a maximum trailer length of 22 ft. Most of those staying at the campground when we were there were truck campers, small motorhomes, and small travel trailers.

How would I rate it? On a scale of 1 to 5, I'd give the Burnt Corral USFS campground a solid 5 stars. Highly recommended due to its location on the lake.

Bargain Alert: Go Solar for only $165!

$
0
0
Are you looking to go solar for a bargain price, but don't know where to start looking? Well look no further. The good folks at Renogy Solar are offering their 100 watt Solar Power Starter Kit for the bargain price of $164.99 through Amazon.com. This high-performance, solar power starter kit will work well not only in an RV, but also an in off-the-grid cabin up in the mountains.

Renogy Solar's solar power starter kit comes with almost everything you need to go solar. It includes a 100 watt mono-crystalline solar panel, the best, most efficient solar panel you can buy; a 30 amp Pulse Width Modulation (PWM) charge controller, capable of servicing up to four 100 watt panels; and two 20 ft MC4 cables to connect the solar panel to the charge controller. To complete the installation, you'll need four aluminum Z-brackets to mount the solar panel to the roof of your RV or cabin, a length of 8/2 wire to connect the charge controller to your 12 volt batteries, and a tube of Dicor lap sealant to waterproof the mounting screws and bracket bottoms attached to the roof. Each positive wire run to and from the charge controller should also be protected with either a 30 amp circuit breaker or 30 amp fuse.

If you don't know much about solar power, you may be wondering what 100 watts will do for you. Well, 100 watts won't be able to run an air conditioner or a microwave. But with lots of sunshine, 100 watts will keep a single 12 volt battery fully charged, so you can run all of your 12 volt devices and a small inverter. If you have, say, two 12 volt batteries in your RV, 100 watts will provide a sufficient trickle charge to keep both from draining, if you watch your usage. Truth be told, if you have two 12 volt batteries (or two 6 volt batteries) you should buy Renogy Solar's 200 watt Solar Power Bundle Kit. In other words, every 12 volt battery in your system should be matched with a 100 watt solar panel for optimum performance. But if you're on a budget, the 100 watt kit will get your started, then you can add more panels later as your finances will allow.

Renogy Solar's 100 watt solar power kit is a high-quality kit, and at $164.99, is simply the best price I've seen for a starter kit. If you're still a little leery about pulling the trigger, check out the customer reviews on Amazon.com. The reviews are overwhelmingly positive and feature a large number of informative questions and answers on the product. It's obvious that this kit is a big seller. Oh, and I almost forgot to mention that Renogy Solar is an American company based out of Baton Rouge, Louisiana. All of their products are made here in the USA. So if you're thinking about going solar so you can do some serious boondocking, don't just think about it, do it. This is a great price for a great product and will get you into the solar power game without emptying your bank account.

The Torklift SafeStep and DirtDestroyer

$
0
0
The Torklift GlowStep is the gold standard when it comes to the aluminum folding step for RV's. No other aluminum folding step maintains its strength and shape better than the GlowStep. I've owned my set for over three years and it still works and looks as good as the day I bought it. Due to the GlowStep's popularity in the truck camper market, it made a lot of sense for Torklift to produce accessories to make the steps even more functional and safe. The Safe Step and Dirt Destroyer are two of Torklift's most recent offerings.

The SafeStep is comprised of several vinyl riser guards that close the gap between steps to help protect your pets and children from potentially falling. The black riser guards are velcro backed and are easy to install. Better yet, the riser guards stay attached to the GlowStep when in the stored position and can easily be removed for cleaning. The SafeStep can be used with steps made by other companies and is UV protected, and like all Torklift products, the Safe Step is proudly made in the USA.

The SafeStep was made with dogs in mind, but humans can benefit from it, too. Often times a dog will be intimidated to go up scissor steps due to fear of falling through the gaps or they become injured due to sliding through the gaps caused by running up the stairs too quickly. Does the SafeStep really work for our four-legged friends? Not for ours. Our dogs have good memories and after slipping and falling through our GlowStep a few times they won't have anything to do with the steps anymore. We have to carry them up. But I know they work. I have friends who use the SafeSteps and their dogs have no problem going up and down them. We've found that the SafeStep is good for humans, too. It eliminates the visual distractions you can sometimes see through the steps when you go up and down them. So for us, it's worth it.  

The Torklift DirtDestroyer is my favorite accessory of the two. It's a specially designed cleaning brush attachment that works with any scissor step including the GlowStep. It attaches easily to the bottom of your step in literally a second or two and really does help keep the interior of our camper clean. Simply scrape your shoes or boots on the bristle attachment a couple times before stepping onto the steps. What I really like about this accessory is that it's small enough to store almost anywhere and is easy to install. It really does a great job keeping the camper free from dirt, small rocks, and stickers (those small rock-like things with the spikes commonly found here in the desert). The DirtDestroyer is very well made, easy to clean (just hose it off), and is, of course, made in the USA.

Pic showing placement of the DirtDestroyer.
Closeup of the DirtDestroyer.

Remembering the USS Arizona and December 7, 1941

$
0
0
"Yesterday, December 7, 1941, a date which will live in infamy." These immortal words by then President Roosevelt the day after the Japanese attack on Pearl Harbor pretty much said it all. As a historian, US Navy retiree, and Arizona native, this date has special significance for me and many other Americans. This attack against the US Pacific Fleet at Pearl Harbor brought the U.S. fully into the Second World War in what became a titanic, worldwide struggle. Next to July 4, 1776 and September 11, 2001, the attack on Pearl Harbor remains one of the most remembered dates in American history.

The symbol of Japan's dastardly attack against the US Pacific Fleet, was the loss of the battleship USS Arizona. Displacing 30,000 tons and armed with twelve 14-inch guns, the Arizona was one of seven battleships moored along Ford Island when the bombing began. She, along with nearly all of the U.S. ships in the harbor, were at their moorings and were sitting ducks when the air attack began at 7:55am. An armor piercing bomb from a Japanese dive bomber penetrated one of the Arizona's forward magazines resulting in a massive explosion that destroyed and sank the ship. Unfortunately, 1,177 men lost their lives on the Arizona that day. Most of the crew was asleep that fateful Sunday morning when the attack began. The Japanese had attacked before a formal declaration of war was announced.

The USS Arizona at sea in the 1930s after her modernization.
The bombed out hulk of the Arizona resting on the harbor bottom.


Over one-half of all those who lost their lives on December 7, 1941 were aboard the USS Arizona. In spite of the heavy losses to the fleet, the shallow harbor allowed nearly all of the damaged ships to be raised and repaired (the exceptions being the battleships Arizona and Oklahoma, the damage was too extensive to warrant any salvage effort to either ship). As a result, the Arizona was stricken from the active role on December 1, 1942, with most of the ship scrapped above the waterline (some of her 14-inch guns were salvaged and used on other battleships and shore batteries).

Today a memorial sits on the location where the Arizona sank on that fateful day. I've visited this sacred site twice and have been deeply touched on both occasions. You can still see oil seeping from the ship's fuel tanks and to this day vessels of the US Navy render honors when passing by the stricken ship.I, too, have took part of these honors while on active duty. Of all the tourist attractions in the state of Hawaii, the Arizona Memorial remains one of the most popular. The battleship USS Missouri, where the Japanese signed their surrender on September 2, 1945, is moored nearby in "battleship row," a fitting tribute to the war and the attack that started it.

The Arizona Memorial with the ship's hull still visible below the waterline.

Among the items salvaged from the bombed out hulk were the two ship's bells. One resides in the Arizona Memorial while the other is on display on the University of Arizona campus in Tucson.

A Question about the Wolf Creek Anchor Bolts

$
0
0
I recently received this question from Gary Q. of Running Springs, CA about the Wolf Creek 850 truck camper tie down system:

Mike, I'm 74 and have a Arctic Fox 29-5T 5th wheel which is too much RV for me. I'm going to sell it. I'm thinking about getting a truck camper, possibly the Wolf Creek 850, but I hear they have had a problem with their attachment system being too weak. With their previous experience I would think they would beef up that area because it is one of the most stressed area in the camper. They keep saying how strong their truck campers are by having a large number of people standing on the roof. That is fine, but it has to be secured to the truck in a manner that makes all the other strength important. Have they fixed that problem yet? 

Gary's question is a good one. I know of two incidents with the Wolf Creek anchor bolts system. Before I discuss the incidents, it will be helpful to provide a little background about the Wolf Creek truck camper. The Wolf Creek is made by Northwood Manufacturing, the same company that makes the Arctic Fox truck camper. The Arctic Fox is known for its high quality, but it's also notoriously heavy and requires a one-ton truck to safely haul it. In order to tap into an even larger truck camper market, Northwood Manufacturing decided to produce a lightweight line of truck campers in 2011 called the Wolf Creek. The Wolf Creek is light enough to be hauled by capable half-ton as well as three-quarter-ton pickup trucks. As you might expect, a lighter camper requires a thinner support structure. Unfortunately, this thinner support structure makes the Wolf Creek anchoring system susceptible to damage under extreme stress.

The first incident occurred last winter to a California resident at Anza Borrego State Park. While the owner and his two children were returning home after a fun-filled weekend, a sudden, powerful gust of wind took hold of the camper and flung it over the driver's side of his pickup truck. At the time of the incident the owner was using HappiJac tie downs and HappiJac turnbuckles (Northwood Manufacturing recommends using only the Torklift frame mounted tie down system). According to the owner, the passenger side rear HappiJac tie down on the truck completely failed along with the front passenger side anchor bolt support structure on the truck camper. As you can see in the photos, the anchor bolts in the Wolf Creek 850 are secured to thick plywood panels under the camper's wings. You can also see that there is a splice in the plywood directly adjacent to the front anchor bolt. It appears that this splice was unable to contain the excessive force exerted upon it.

Photo of the incident shortly after it occurred.
View showing the spliced plywood panel pulled out.
Closeup of the spliced panel and anchor bolt.

This incident occurred due to three factors, a "perfect storm" if you will. First, the excessively strong wind gusts in the area. Anza Borrego State Park is known for for it's high winds with gusts sometimes in excess of 80 mph. Second, failure of the HappiJac tie down attachment point on the pickup truck's rear bumper. And third, failure of the Wolf Creek camper's front anchor point. Both the truck and camper were considered a total loss by the owner's insurance company. Remarkably, the truck camper suffered no major structural damage from the incident, a testament to Northwood Manufacturing's high build quality. I should also point out that this particular Wolf Creek 850 was a long-bed model. It's also worth noting that the owner has since received a brand new 2014 model and is reportedly very happy with it.

The second incident happened this past summer to an Arizona resident. According to the owner, the incident occurred while driving home on an Arizona Interstate. The owner happened to notice in his side view mirror that the plywood was separating where the front, driver's side anchor bolt was located. According to owner, approximately 6,000 miles had been put on the camper in the time that it had been owned and had driven off-road very little. The dealership where the owner had purchased the camper installed HappiJac tie downs in the front of his pickup truck, but the owner wasn't comfortable using the HappiJac tie down for the rear, so Torklift tie downs were used instead. As you can see in the photos below, the plywood is clearly splitting and separating where the front anchor bolt attachment point is located. Judging from the photos, it appears that the HappiJac tie downs were overtightened and exerted an excessive force while driving at highway speeds to create the separation. Unlike the other incident, however, the failure of this anchor bolt support structure doesn't appear to be the result of a splice in the plywood.

Split in the plywood along the front driver side anchor bolt.
Another view of the plywood separation.

What did Northwood Manufacturing have to say about this one particular incident? Well, according to the owner, a company representative said that this damage wasn't covered under warranty because "they have no way of knowing what forces were put on the tie downs." Northwood recommended that the owner claim the damage on the owner's insurance. The representative also told the owner that "Arctic Foxes are not built this way, that they are tied down to the floor and walls." Like the first incident, the Wolf Creek 850 camper in this particular incident was a long-bed model. 

What do I think about this issue? Well, first off, I own a short-bed model of the Wolf Creek 850. I'm not exactly sure if having a short-bed model makes a difference, but it might since plywood splices aren't necessary for the short-bed wings since they're a good 2 ft shorter because of the side storage boxes. All I know is that in the three years I've owned by Wolf Creek 850, I've experienced zero problems with the anchor bolt system. I've driven on very rough dirt roads as well as in areas where wind speeds in excess of 70 mph were encountered. I also use the Torklift frame mounted tie down system for my camper, which is the system Northwood Manufacturing recommends using in their Wolf Creek brochures. Overall, I've been very happy with my Wolf Creek 850 and said so in a full-length review that I wrote in November 2011.
 
As for the causes of the two incidents, I believe that the HappiJac tie downs were a contributing factor. Why? Because the HappiJac front tie downs exert undue force in the forward direction, not a good thing for the Wolf Creeks, whereas the Torklift tie downs exert a force downward (this isn't to say that I think that the front HappiJac front tie down system is inferior in any way. It just isn't compatible with the Wolf Creek anchor design). However, I do have serious reservations about the HappiJac rear tie downs, especially with the thin bumpers being produced by today's automakers. I've known several people who have experienced failures with the HappiJac rear tie downs or have experienced warped rear bumpers from the tension. It simply isn't a very strong or secure attachment point.

Another contributing factor in these two incidents is excessive turnbuckle tension. This may have played a role in the first incident and probably played a big role in the second. In the second incident, it's hard to believe that simply driving down the freeway would cause the plywood to split in the manner that it did. The owner stated that he didn't take the camper off-road very much. The only things that could cause this type damage is either an overtightened turnbuckle or excessive head winds. The owner mentioned nothing about excessive winds on his trip home, so it appears that overtightened turnbuckles is the culprit. Overtightening is actually a common mistake made by newbie truck camper owners. There's no need to go medieval on them, they only need to be snug (refer to your manufacturers instructions to achieve proper tension).

The final factor in these two incidents is, of course, the Wolf Creek anchoring system. I do think that Northwood Manufacturing can improve the design. As you can see in the photos above, the anchor bolts are not bolted through the camper's frame. Instead, they're bolted through reinforced plywood on the wings, the thickness of which appears to be a couple inches thick. This design simply isn't strong enough to resist the extreme forces that are sometimes exerted upon them. In my view, a good solution would be to weld or bolt an aluminum plate to the frame where the front tie down points are located. The anchor bolt would pass through the plate in addition to the existing plywood support structure.

That's my take on the matter. To get Northwood Manufacturing's take, I spoke with Doug Karr, Northwood Manufacturing's "Truck Camper Guy." Doug admitted that there was a problem with some of the early Wolf Creek anchoring, but the design and process has been incrementally improved since then. He said that if you use a frame mounted tie down system and apply the correct amount of torque to the turnbuckles, you will avoid problems. Doug also brought up the fact that this isn't a widespread problem and that only two incidents have been reported of the hundreds of Wolf Creek campers that have been manufactured and sold. If you do encounter a problem, however, Doug said that Northwood Manufacturing will do everything they can to make the problem right. He encourages those who encounter issues to contact him directly. To reach him call Northwood Manufacturing at (541) 962-6274 then ask the receptionist for Doug's cell phone number.

So to answer Gary's original question, has Northwood Manufacturing fixed the Wolf Creek anchor bolt attachment system? The answer is yes and no. During the three years of the Wolf Creek's existence, the anchoring design has been improved, but in my opinion the fixes don't go far enough. A design that bolts through the frame is what is really needed. Until Northwood Manufacturing makes that change, I recommend using the Torklift frame mounted tie down system and refrain from over tightening your turnbuckles. This approach has served me well in the three years I've owned my Wolf Creek 850 and should serve you well, too.

RV Boondocking FAQ

$
0
0
  1. What is boondocking? A simple definition of boondocking is RV camping in a remote location without water, sewer, and electrical hookups. Synonyms of boondocking include primitive, dispersed, or wilderness camping. Unfortunately, the word boondocking is often misused in the RV community. A stop at a campground without hookups isn't really boondocking, rather this is known as "dry camping." Moreover, staying overnight at a Walmart, Cracker Barrel, or a Flying J's parking lot isn't boondocking either, though you'll sometimes hear people refer to it as such. This type of "camping" is often called "overnighting" or "Wally-docking."
  2. What is the main difference between boondocking and dry camping? Like the best real estate investments, it all comes down to location, location, location. Boondocking implies remote camping in an undeveloped or primitive site, out in the boonies, if you will, while dry camping means camping anywhere where there are no hookups, like at a campground, on a remote street, or at a Walmart parking lot.
  3. What makes boondocking so appealing to RV owners? Because its free, offers more privacy, offers more peace and quiet, and provides greater access to the natural wonders of this great land. It also offers better opportunities for stargazing and bird watching.
  4. Where can I go to boondock in the United States? The best boondocking is found west of the Mississippi on federal land managed by the U.S. Forest Service (USFS) and the Bureau of Land Management (BLM). The BLM oversees 258 million acres of federal land, about 13% of the U.S., while the USFS manages national forests and grasslands totaling 193 million acres, equal in size to the state of Texas. Generally, all of these areas are open to camping within 150 ft of roads as long as there are no signs that prohibit overnight camping. U.S. Army Corps of Engineers land, state forests, and state wildlife reserves are additional options where you can boondock in your RV. Unfortunately, U.S. National Parks typically don't allow boondocking (Death Valley and Big Bend National Parks being the most notable exceptions), camping is restricted to designated campgrounds only.
  5. Why are there more places to boondock in the Western US compared to the Eastern US? Because there is more public land west of the Mississippi River than east. It's that simple.
  6. Do you have any tips on locating specific spots where you can boondock? If you're headed to an unfamiliar area, here are a few. Use Google Earth or buy a good map or Atlas that shows longitude and latitude and key terrain features such as lakes, rivers, and roads. Roads are the key to locating the best places to boondock, especially within US National Forests. Another tip is to "stealth camp" in an inconspicuous location like at a trail head parking area to or stay overnight at a campground and scout out promising locations in a tow vehicle, motorcycle, or quad. You can document these locations using either a map or a GPS. Blogs--like this one--Internet forums, and locals are great sources on places where you can boondock, too--all you have to do is ask.
  7. Why are some RV owners reluctant to share their favorite boondocking spots on the Internet? Because they don't want their favorite boondocking spots spoiled by vast throngs of RV'ers or trashed by inconsiderate people. Many RV owners, however, will share info on lesser known locations via private message or email.
  8. Why is Quartzsite, AZ known as the boondocking capital of the world? That's a great question. There's nothing really special about the town of Quartzsite. It's actually kind of ugly. It's where the town is located that makes it special. First, the town is easy to get to as it's located on the I-10, an important interstate linking the major cities of Los Angeles and Phoenix. Two, the town is surrounded by enormous plots of federal public land where free camping is not only allowed, but it's practically encouraged. Third, due to the elevation and southern latitude, the weather in town during the winter months is darn near perfect with daytime temperatures consistently in the 60s and 70s. These facets combine to make Quartzsite an ideal location for a low-cost, winter retreat for hundreds of thousands of RV owners.        
  9. Which type or class of RV is best for boondocking? You can boondock in any type of RV, but the best boondocking RV's are those which are small, maneuverable, and capable of reaching hard to reach places. The more remote the location better. A 4x4 drive train is a plus. A poll on this very topic revealed that the 4x4 truck camper is the best, most capable RV for boondocking. Small two-axle 4x4 RV's, like the Provan Tiger and Sportmobile van, are terrific boondocking rigs as well. 
  10. Where can I go to dump my waste tanks after I boondock? Dumping your black water tanks in the wild is illegal and extremely inconsiderate. Don't do it. The laws for dumping your gray water varies by state and by agency, some allow it, some don't. Do your research before dumping gray water in the wild. The best tool for locating a dump site near you is the Sanidumps app. Try to find a dump site where the cost is $5 or less. Anything higher than that is a rip off, but sometimes can't be helped. 
  11. What is a "Navy shower?" Simply put, it's a shower when you get wet, turn off the water, soap up, then rinse off. It's the best way to conserve the limited water you have in your RV's fresh water tank while maintaining your hygiene. Any shower head works well for a Navy shower, but the Oxygenics Shower Head offers the best water pressure without using extra water--a win win for boondocking enthusiasts.
  12. Do you have any other ways or tips to conserve fresh water while boondocking? Of all your resources, water is your most precious. Use it wisely. Never leave your faucet running while using the tap. Use a half cup of water or bottled water to brush your teeth. Use disposable cleansing wipes for personal hygiene. For meals, use paper plates and plastic cups, bowls, and eating utensils that way you won't need to wash dishes. When dish washing is necessary, wash them in a small tub and save the dish water for flushing the toilet. Keep in mind that limiting the amount of fresh water you use in your RV also limits the amount of gray and black waste water that you generate.
  13. Where can I go to refill my fresh water tank? Potable water can be obtained from numerous sources while you're camping off-the-grid. These include state parks, campgrounds, and USFS ranger stations as well as BLM welcome centers, truck stops, and gas stations. Use a Water Bandit and a hose to get potable water from non-threaded water spigots. Potable water can also be obtained from natural sources like lakes and streams, of course, but make sure you filter out any sediments and purify it first before you drink it. Few things can ruin a trip like a bad case of the runs. 
  14. How many batteries should my RV have to successfully boondock? Boondocking RV's should have a minimum of two 12 volt or two 6 volt batteries. Buy deep cycle batteries rather than hybrid RV/Marine batteries since they can endure more deep cycle discharges and last longer than hybrid types. It doesn't matter if you buy AGM or wet-cell deep cycle batteries for your RV. Both have their pros and cons. AGM batteries require no maintenance, but they also cost twice as much, if not more, than regular wet cell batteries.
  15. What are the best options available to recharge my batteries while boondocking? First of all, avoid draining your batteries below 12.2 volts (50% state of charge) when camping off-the-grid. Employ solar power, a wind turbine, or a generator as your primary method for recharging your batteries rather than your truck's alternator, which because of wire size, is too slow. Have a good backup if your primary means to recharge your batteries fails. When going solar, install a minimum of 100 watts of solar panel for each battery in your RV, though more is better. If you decide on a generator, avoid the noisy and cheap industrial types and go with the whisper-quiet inverter types instead, like the Honda EU2000i or the Yamaha 2600. When choosing a wind turbine, buy one that is light, easy to deploy, and generates ample current--at least 6 amps.
  16. What modifications and things can I do to make my RV more boondocking friendly? The most popular mods include installing at least two deep cycle batteries, swapping out the incandescent lights with LEDs to conserve energy, and installing a battery monitor system like the Xantrex Link Lite or the Trimetric. Additional boondocking mods include installing solar panels to keep your batteries charged, additional 12 volt and USB charging outlets, and an Oxygenics shower head to help conserve water during showers. To see my top five boondocking mods, click here.
  17. What is the best way to heat my RV for winter boondocking? The propane furnace that came with your RV will keep you warm, but it will also rapidly deplete your propane reserves and quickly draw down your batteries while in use. The catalytic heater or "cat heater" is the best, most efficient way to heat your RV during the winter. They throw off a tremendous amount of heat, use no electricity, and use less propane than a furnace. They do require fresh air for proper air exchange, so you'll need to crack a window or vent. When buying a cat heater don't waste your money on the cheaper, lower capacity models, buy an Olympian Wave-6 in case it's needed during an extreme cold spell. 
  18. Is boondocking considered a safe way to camp? Absolutely! Boondocking is actually safer than staying at a campground or RV park. Think about it, there are a lot less people in the wilderness, which reduces the chances of running into thugs, thieves, and other undesirables. But you need to be smart about it. Keep valuables like generators locked up. Be aware of your surroundings and those around you at all times. If you're boondocking alone, don't advertise that fact and your location on the Internet (this is especially true for women traveling alone). Additional things you can do to help ensure your safety include bringing along your favorite four-legged friend, or a hand gun or tazer, or a can of mace or bear spray.
  19. Are there any special precautions I can take when it comes to wildlife? If you have a small dog or cat as a pet, don't leave them tied up outside unattended. Otherwise, they'll may be eaten by a pack of coyotes or a cougar. Avoid moose and bear, especially when accompanied by young. And speaking of bears, they have a very keen sense of smell. Don't leave food outside your RV or you'll attract them to your campsite. Keep your garbage out of the reach of animals. A great way to do this is to tie off a garbage bag high on a tree branch using a cord or rope. When hiking in the southwest and southeast, beware of poisonous snakes, especially under bushes.
  20. What things should I bring with me when I boondock? Since you'll likely be camping out in the boonies and well beyond cell-phone range, self-sufficiency is the key to boondocking safely. Make sure you're prepared for all kinds of emergencies. Bring a well-stocked first aid kit as well as a good emergency roadside kit. Make sure you also bring along extra 12 volt fuzes, a roll of duct tape, a tow strap, and a good tire repair kit. You'll also want to have a way to defend yourself if required.
  21. Are there any written and unwritten rules when it comes to boondocking? There are a few. Be considerate of others and the environment when you boondock. Use only authorized roads and established campsites when required. Extinquish your campfire, pick up your trash, and leave your campsite pristine. Observe the law on the use firearms and hunting in the area where you're camping, and don't trail blaze--keep trucks, motorcycles and ATV's on established roads and trails. The best approach when boondocking is to simply leave your campsite in better condition than when you arrived. Taking care of our public lands is not only the right thing to do, it's also good for the environment. See Title 36 of the Code of Federal Regulations for additional information including fines.

RV Tip: Water Heater Maintenance

$
0
0
If your RV water heater is like ours it gets a lot of use. It's recommend that RV owners maintain their water heaters once a year, especially in areas where the water has a high mineral content. Unfortunately, many neglect this basic yet very important part of RV ownership and eventually suffer the consequences in poor operation and high maintenance costs. Fortunately, maintaining your RV's water heater isn't very difficult, but it does take a little forethought and planning.

Water heater maintenance consists largely of draining and flushing out the tank. You may be wondering why doing this annually is necessary. The reason is because of mineral build-up. Over time, the minerals contained your your water builds up and forms a corrosive coating over the internal components of your water heater. These internal components include the tank itself as well as the heating element and heating tubes. You may think that mineral build-up isn't that big of a deal, but you might be surprised by what you see the first time you perform this maintenance. Each time I've drained my water heater in the previous RV's I've owned, I've been shocked at the amount of mineral build-up. Without a doubt at least a 1/2 cup of minerals has come out each time I've performed this maintenance. Here are the basic steps needed to maintain your water heater:  

1. Drain Tank: This is a pretty simple process but can get you hurt if you're not careful. First, make sure the water has cooled off sufficiently before you begin work (many like to turn off their water heaters the night before). Don't take this lightly. Newbies often get burned from the scalding hot water, so please don't overlook this step. Next, release the pressure in your tank by opening the pressure relief valve at the top of the tank. With the valve open, remove the drain plug from the bottom of the tank to allow the water inside to drain out. For Suburban models, you'll need a 1 1/16 inch socket to remove the anode rod while for Atwood models, you'll need a 7/8 inch socket to remove the drain plug (Atwood models are made of aluminum and don't require an anode rod).

2. Flush Tank: To perform this task you'll need a so-called flushing wand. You can purchase one at any RV Parts store for around $7 and is a good item to have in your RV maintenance kit. These connect to a standard garden hose and come with a small valve to turn the water on and off. Simply, insert the wand into the drain hole and turn on the water. Make sure you rotate the wand as you flush out the tank to ensure all areas of the tank are getting clean. At first, the water draining out will have a milky appearance from the high mineral content, but will soon clear up. When the water clears up you know that the tank is clean.

View showing white mineral deposits around the drain hole.

3. Clean Tank: This process is a bit more involved and should be done every two or three years (the periodicity depends on the quality of the water where you live). This is done by using a combination of white vinegar and fresh water, usually a 50/50 ratio. Getting this mixture into your water heater tank can be accomplished in one of two ways: by using your RV's winterizing system intake or by attaching a hose with the appropriate sized fitting directly to the water heater drain and filling the tank manually. Once the mixture is in your tank, turn on the water heater and allow the hot water inside to boil for at least a couple hours, more time is better. Once this is accomplished, turn off the water heater again and allow the water inside to cool off. Remove the drain plug and flush out the tank again using the flushing wand procedure as stated above.

View showing what little of my anode rod remained.

4. Inspect Anode Rod (Suburban water heaters only): This inspection is simple yet very important. The rod portion, which is made of magnesium, is actually molded to the drain plug and acts as a magnet of sorts to attract the corrosive elements and minerals found in your water. The anode rod is essentially sacrificing itself for the good of your water heater. Anyhow, the anode rod is quite large when brand new and installed. Over time, the rod deteriorates and should be changed out as required. This is another reason why it's important to clean and inspect your water heater annually. It's also a good idea to have a spare anode rod on-hand at all times. Camping World sells these for around $20 a piece.


So how long does an anode rod typically last? It depends. The mineral content where you live really plays a large role in how often you need to change yours out. Here in Arizona I can usually go two years before I need to replace mine. But I know many who live in areas where the mineral content is low, like in Washington State, Idaho, and Montana, can go as long as four years and sometimes longer.  

Kind Words from a Reader

$
0
0
Hi Mike,  I’ve been wanting to drop a line to tell you that I’ve really been enjoying your website since I initially discovered it about 2-3 months ago.  Probably the best site that I have seen that is “all things truck camping.”  My wife and I had been through two travel trailers and finally decided that we wanted a truck camper.  I think that what clinched it for her was when we took a wrong turn in Mt Rainier National Park last September and drove down a dirt road for several miles because there was absolutely no place that we could turn the rig around.  We finally came to a barricade where the road was blocked because of a landslide.  We removed the barricade and walked a little further and came to a place where we could actually turn around. Then we drove in and managed to turn around and drove out.  My wife was really frightened by the experience, and I have to say that I was wondering how it was going to turn out.  The point is that if we would have been driving a truck camper, we could have turned around immediately.  This was just the last of several times that we drove into situations that had us worried.  There were also camping opportunities that we had to pass up because the space would not accommodate a rig the size of our 28 ft trailer, plus the truck.

By the way, you and I have something else in common.  I, too, owned an F-250 that just was not going to be enough truck, payload-wise, to haul a hard side truck camper with a slide.  I tried it, but after adding airbags and stable loads I was still not comfortable that I was driving a rig that was safe.  I went out looking for a Dodge Tradesman 5 days ago, and ended up with a 2014 Laredo 3500 4x4 diesel with a crew cab.  It was really painful to give up the 250, but there is a lot more peace of mind with having the right truck. And the dealer gave me a pretty good deal on the Laredo due to end of year clearance, incentives, a good rebate. and a good trade for the 250. 

Mostly I wanted to let you know that I am really glad that I found your site and that I am learning a lot from it,  My wife and I are anxious to get back on the road and especially interested in going to Arizona and Utah to explore some of the areas that you talk about on the site.  We are retired for this past year so we want to see all that we can of the National Forests and Parks, as well as the BLM areas.

John in California
Lance 855s

Buying a Truck Camper, A Few Considerations

$
0
0
For consumers looking to buy a new RV, most never consider a truck camper and I think that's a serious mistake. Today's truck campers possess the same accouterments as the finest motorhomes and fifth wheels found in today's market. Indeed, some hard-side, long-bed truck campers offer large dry baths and sport as many as three slide-outs to increase living space. Most are also quite spacious and roomy and offer large kitchenettes and full-size queen beds. This short article will concentrate on truck camper options and considerations only since pickup truck suspension upgrades and equipment have been covered in previous articles.

If you're starting from scratch and have neither a truck nor a camper, it's best to choose your camper first. This will save you angst and money in the long run. Like any RV, you'll want to buy the camper that meets your requirements as far as size and features are concerned.  You'll also want to buy one that will allow you to go where you want. If you plan on doing a lot of off-roading then you should look hard at a pop-up truck camper. These are lighter, have a lower profile, and have a lower center of gravity for tackling the most challenging roads and terrain. If your travel plans are less ambitious, however, and you desire more security and a more capable four-season camper, then the hard-side truck camper will probably suit you better. That isn't to say, you can't do a lot of off-roading in a hard side truck camper. You can. But if you decide to go this route I recommend a non-basement model, with a low center of gravity, and a width of no more than 7.5 ft.

When it comes to truck campers, weight is a very important consideration, if not the most important. Manufacturers list the unloaded "dry" and the fully loaded "wet" weights of their campers on their websites and brochures, but these figures can be deceiving. These numbers don't include installed options, like air conditioners, and never include things like food, clothing, cookware, utensils, and camping gear. Never buy a truck camper based upon the manufacturer weights alone. To give you a better idea of what the camper will actually weigh when you use it add 1,000 lbs to the camper's listed wet weight. This often-used rule of thumb works surprisingly well for truck camper owners and has proven to be pretty accurate when going to scales. Obviously, you'll want to ensure that the truck you choose has a payload rating higher than this more realistic camper weight figure.

An often overlooked factor when choosing a truck camper is how it's constructed. Aluminum framing is used by most truck camper manufacturers today, but there are several that still produce wood framed units. There are pros and cons to each. Aluminum is lighter, doesn't rot, and is mold and termite resistant, but it also more expensive, is subject to more thermal loss, and requires proper welds for the structure to hold up over time. On the other hand, wood is stronger, cheaper, easier to work with and repair, and insulates better, but is also heavier, can rot and mold over time if exposed to moisture. Wood also flexes better than aluminum. It's for this reason that some manufacturers that specialize in off-road campers--like Four-Wheel, Phoenix, and Northstar--still use wood rather than aluminum for their frames.

Off-road view of an Outfitter Apex 8 pop-up truck camper.
The Arctic Fox 811 features a basement and a slide-out.

Should you buy a truck camper with one or more slide-outs? That's a personal choice. There are certainly some big positives with slide-outs, the most important being the extra space and roominess they create, but they're also heavy, tacking on an average of 400 lbs to the weight of the camper. Slide-outs can also leak, create drafts when extended (a major consideration for those who like to camp in the winter), and can breakdown. Like anything it really comes down to what's important to you. If you think you'll need the extra space that the slide-out provides and you think you'll camp mostly on well-maintained roads, then I would get one. But if you are planning on going off-road quite a bit and plan on doing a lot of exploring, then I would avoid them. The stresses they can create to the frame of the camper can eventually cause problems.

Another popular truck camper feature is the basement. Basement models offer more storage and floorspace by allowing the holding tanks to be placed underneath the floor, but they also add more height to hard-sided campers, not a good thing for those who like to off-road and explore heavy forested mountain roads. Basements can also be a negative for those who enjoy winter boondocking as the tanks can freeze if they're not adequately heated. All things considered, the positives of having a basement far outweigh the negatives, especially for pop-up campers since camper height really isn't an issue. Most pop-up truck camper manufacturers like Northstar, Phoenix, and Four Wheel offer non-basement models only; Outfitter is the only company that I know that produces a pop-up truck camper with a basement. 

An important term you'll need to become familiar with when shopping for a truck camper is the truck camper's Center of Gravity (COG). Every camper has a COG which identifies where along the length of the camper the weight is centered. Basically, the camper's COG needs to be in front of your truck's rear axle. Most campers have a sticker identifing where the COG is located to take some of the guess work out of it. You never want to have the COG behind your rear axle because this will impair your truck's handling. Verifying that your COG is good is fairly easy and will require a couple trips to the scales with and without your camper. If your front axle weighs less with your truck camper on your truck then your COG is "off." You can usually correct this by reloading your camper, ensuring that most of the weight is in front of your rear axle.

Top 6 Winter Boondocking Mods

$
0
0
When most people hear the words "winter boondocking" they think about camping in a snow covered forest in freezing temperatures. Winter boondocking, however, doesn't have to be that extreme. Winter boondocking can also mean camping without snow like in Arizona's Sonoran desert where temperatures might dip into the 20s at night, yet see daytime temperatures in the 60s. Either way, winter boondocking presents its own set of unique challenges that must be tackled if you want to do it successfully. This article will explain how and will provide six modifications to help make your winter boondocking experience a better one.

Obviously, keeping the camper warm during freezing temperatures is key. This can be a challenge for some truck campers, but not all. A manufacturer might say that their camper is four-season capable, but that doesn't necessary mean that it will do well in winter weather. Such is the case with my Wolf Creek 850 truck camper. Northwood Manufacturing says it's a four-season rig, but the only things that make it so are a 20,000 BTU propane furnace to keep the camper warm and a single fan to help circulate the warm air in the basement (dubbed the "heated holding tanks" option, this fan prevents the holding tanks and plumbing in the basement from freezing). Moreover, the outer walls of the Wolf Creek are only an inch thick, a inch thinner than the two-inch thick walls found on the more stout Arctic Fox truck campers, so I had to look for other ways to insulate and warm my camper better.

The first thing I did before embarking on my first winter trip was to inspect my camper for any weaknesses that could be penetrated by the cold. I closely inspected all outside walls and joints for gaps. Any gaps that were found were quickly sealed with caulking. Weather seals on doors, hatches, and vents were also inspected (if you have a slide-out, you'll want to examine the weather seals for that, too. When extended, slide-outs are notorious for letting in cold air). Any defective seals were replaced, and in a few cases, were beefed up with a thicker and better weather seal. A non-insulated outside drain valve hatch was insulated with Reflectix Bubble Pack Insulation. Block foam was also applied to the outside of the two truck bed access doors.

Propane is a critical resource for anybody seriously interested in winter boondocking. You need it to heat your camper, cook your food, and if you have one, run your propane-fired generator. The more propane you have the better, so make sure your tanks are full before embarking on your trip. Our truck camper came standard with a single 5 gallon propane tank, but we opted for a second tank to double our propane reserves. If this option is available when you're shopping for a camper, get it. If your camper is smaller and has room for only a single tank then carry a second tank with you. You may not need it, but you'll feel better knowing it's there if you need it.

What else can you do to make your camper more adept for winter boondocking? Here are six, easy to install modifications: 

1. Catalytic Heater: 
The propane furnace that came with your RV will keep you warm, but it will also rapidly deplete your propane reserves and quickly draw down your batteries while in use. The catalytic heater or "cat heater" is the best, most efficient way to heat your RV during the winter. They throw off a tremendous amount of heat, use no electricity, and use less propane than a furnace. They do require fresh air for proper air exchange, so you'll need to crack a window or vent when it's in use. When buying a cat heater don't waste your money on the cheaper, lower capacity models, buy an Olympian Wave-6 in case it's needed during an extreme cold spell. When not in use, make sure you keep it covered as dirt and dust can collect on the coils and cause it to smell when first turned on. Hands down, the best winter boondocking mod you can make.

2. Thermal Pane Windows:
Yes, those single pane windows in your camper will provide you with terrific views, but they also lose a tremendous amount of heat. One way to remedy this is to retrofit a set of thermal pane windows in your camper. Thermal pane windows typically have two panes with the void in between filled with argon or krypton gas. The insulation difference between single and thermal pane windows is pretty significant. Besides the cost, the only real negative with them is that they aren't particularly suitable for high-vibration environments. The severe vibrations cause the seals to fail, the gas inside to leak out, and the windows to fog over. In spite of this negative, however, the pros of thermal pane windows far outweigh the cons.

3. Memory Foam Mattress and Cabover Insulation Upgrade: 
As any truck camper owner will attest, the cabover area in truck campers can get quite cold during the winter. One effective remedy is to upgrade the flimsy and cheap OEM spring mattress with a Memory Foam Mattress. The queen size memory foam adds a tremendous amount of insulation for a large, 33 sq ft area. I went with an 8-inch thick mattress which provides just the right amount of insulation and comfort. And before installing the mattress, I also recommend installing a layer of Reflectix insulation to the bottom of the cabover. The memory foam mattress and Reflectix together will significantly improve the insulation value of the cabover area while at the same time making your sleep much more comfortable.

4. Basement Insulation Upgrade:
There's no doubt about it, a frozen fresh water tank or frozen water line can ruin an outing not to mention inflict costly damage to your camper. The four-season campers being produced by manufacturers today have adequate amounts of fiberglass insulation in the basement, but improvements to the insulation can still be made to retain the heat better. Either fiberglass or Reflectix insulation can be used though I'm partial to the latter as it's cheaper and easier to use. Apply the new insulation along the periphery of the basement as well as on the bottom to hold in the heat and keep out the cold. Apply it to the desired surfaces using a staple gun or Reflectix tape. 

5. Basement Vent Fan:
If you have a basement in your truck camper and you lack a vent fan to circulate air in the basement, then this modification is a must. Fortunately, most four-season truck campers already have a vent fan to prevent the holding tanks and plumbing from freezing, but another fan is sometimes warranted to help improve air flow. Fortunately, my camper already had a passive cold air return vent so installing a fan at that location was a fairly easy modification. Any small computer fan or similar 12 volt fan will work for this modification. In addition to the fan, I also recommend installing a switch so the fan can be powered off as well as buying a fan that can reverse directions.

6. Vent and Skylight Insulation:
When it comes to insulation, you can never have enough in an RV, especially when it comes to the vents and skylights. These roof fixtures are like sieves when it comes to heat loss, but effective remedies can be put in place. For the ceiling vent fans, cut a 14x14 inch piece of 2 inch thick foam and place it into the vent housing. Cover the foam with a specially made cover (vinyl or linen work best), then cover the foam and vent housing with a 16x16 inch plastic cover to hide the foam insert. Or if you prefer, insulation kits like the Camco Vent Insulator can be purchased instead at RV stores or on Amazon.com. You'll be amazed at how well the insulation insert works. For skylights, cut a piece of Refectix insulation to fit on the inside of the skylight surface.

A special thanks to Bryan Appleby, Nolan Sturgeon, and Kerry Stark for permission to use their photographs. 

Fan-tastic Vent Cleaning and Maintenance

$
0
0
The Fan-Tastic Vent Fan is a must-have RV item, especially if you enjoy off-the-grid camping or boondocking. This 12 volt, American-made fan moves a tremendous amount of air and makes a big difference in comfort in your RV, especially on warm summer nights. If you're like me, your fan gets a lot of use during the year. This heavy use means that periodic cleaning and maintenance is necessary to keep it looking good, to prevent leaks, and to keep the fan working in peak operating condition. I like to clean my fan two or three times a year.

As you probably already know, the screen and the 12-inch fan blade get the dirtiest and require the most amount of attention. In 2009, Fan-tastic Vent came out with Fan-Tastic Pop and Lock Screen which snaps into place. The Pop and Lock screen really makes the task of cleaning-up quick and easy (the old screen had eight small screws that took forever to remove). If you've never removed a pop and lock screen, a few tips are warranted. First, some force is required to pull the screen away from the fan housing, so don't be afraid to give it a good yank. Just grab the flared edge of the screen frame and pull down. Once that side of the screen is loose, just condense and rotate the screen frame a bit and it will come loose. To clean the screen, I recommend that you clean it in a sink with suds and hot water. Some light scrubbing may be necessary to get the screen completely clean.

Cleaning the fan blade while it is attached to the motor is possible, but is cumbersome and time consuming. In order to clean the topside of each blade, you'll need to slightly advance and reverse the fan to allow your fingers access (the bowtie motor mount gets in the way). After awhile you'll get the hang of it. Like I said, it does take time, but you can do a pretty decent job of cleaning the blades going this route. Unfortunately, you won't be able to wipe down the outer edges of the vent housing and fan blade, but that's the tradeoff cleaning it in this manner. 

Cleaning the fan blade is possible with the fan still mounted.

Cleaning the fan blade in much easier by first detaching it from the motor. Removing the fan blade from inside your RV is possible, but it does require removal of the entire screen assembly first. If you decide to go this route, you'll want to first remove the fuse. Once this is done, remove the two screws holding the lift motor in place as well as the three screws that attach the screen assembly to the vent housing. After these are removed the assembly will drop from the housing (most people just let the assembly hang from the wires since the assembly really doesn't weigh that much). Next, remove the fan blade by removing the brass-colored Phillips-head screw from the center shaft (if you have an older model you'll need to loosen the 3/32 inch hex screw on the blade core instead).

View showing the fan blade removed from inside the RV.

Like the screen, I recommend soaking the fan blade in a sink with suds and hot water though wiping it down with a window cleaner like Windex works well, too (another option is to wash the screen and fan blade in a dishwasher). Before reattaching the fan, you'll want to clean the radius-ed edges of the screen assembly as this often gets just as dirty as the blades themselves. Once the fan is cleaned, reattach it and the screen assembly by reversing all of the steps you took for removal. Make sure the wiring is tucked away properly and not crimped or jammed when reinstalling.

UP ON THE ROOF

In the opinion of some, the roof offers the best access to clean your Fan-tastic Vent. First, you'll need to disengage the arm that moves the vent cover up and down by removing the screw. Once this is done, pull the vent cover all the way back then remove the four screws that hold the fan motor bowtie mount to the housing. Before lifting the motor out, you'll need to disconnect the 12-volt wiring. The snap-tight wiring connectors make this easy to do in some models. Remove and clean the fan blade as described earlier and give the screen assembly and vent lid and good cleaning before you reassemble everything. While you're up there, you'll also want to treat the rubber gasket seal with a good UV resistant lubricant to keep it soft and supple. Lubricating the motor with a light machine oil is also a good idea.

The last and perhaps the most important step involves a careful inspection of the vent caulking around the flange. Make sure the caulking is tight and has no cracks in it. If there are any signs of old and cracked caulking, you'll want to remove it and apply fresh caulking (I prefer Dicor lap sealant for all of my rooftop caulking). An even better alternative, however, is to apply strips of Eternabond Tape over the flange of the vent. This easy-to-use tape will provide a water tight seal that will last well over 10 years.

Cracked caulking means leaks and must be corrected.
Leaks repaired with Eternabond Tape.

Making the Switch: Review of the 2013 Ram 3500

$
0
0
One of the great things about writing a blog is the interaction with readers. One question asked of me several times during 2014 is why I bought a new truck just two years after writing a glowing review of my 2011 Ford F-250? The answer really came down to three things: First, I needed a truck with more payload to haul my toys. The payload of my F-250 was simply maxed out and left me with few options for towing and camper upgrades. Second, I needed a 4x4 drive train for exploring more remote  off-road trails. And third, I wanted a diesel. I simply missed the horsepower, fuel economy, and torque that a diesel engine provides.

When I started looking for a new truck, however, I soon found myself in a dilemma. My last three trucks were all Fords with few if any problems. I believe in brand loyalty. I really like Ford's, but with the spotty reliability of Ford's Scorpion 6.7L PSD engine and what I found to be the excessively high cost of the 2013 F-350s, it was time to look elsewhere. After hours of research, several test drives, and much deliberation, I decided to pass on a Ford and purchase my first Dodge in over 30 years, a 2013 Ram 3500 4x4 short-bed pickup truck. After 9,000 miles and one year of use, I finally feel like I can give an honest and complete review of this truck. It's hoped this review will be more useful than those provided by the major auto publishers who drive a vehicle for only a few days or a week before writing their review. 

ONE WORD: CUMMINS

The main reason for choosing the Ram 3500 over the competitors really came down to one word: Cummins. The Cummins name has been synonymous with quality since the 1950s and their current offering, the 6.7L turbo diesel, is no different. Introduced in 2007, the Cummins 6.7L turbo diesel has proven to be a winner. Due to the EPA's strict new diesel emission requirements, however, the company was forced to make several changes to the engine. These changes include an EGR (Exhaust Gas Recirculation) system, a variable geometry turbocharger (VGT), and a diesel particulate filter designed to reduce diesel particulate matter by more than 90 percent. In addition to these changes, the engine also employs a new, higher-pressure version of the Bosch direct injection system, and in 2013 SCR (Selective Catalytic Reduction) with DEF (Diesel Exhaust Fluid) injection became standard with the high output version of the engine (more about DEF later).

Aside from the outstanding reliability that comes with the Cummins name, what I really like about the 6.7L turbo diesel is that it offers class leading horsepower and torque. The inline-6-cylinder, cast iron engine offers 350 horsepower and 660 ft-lbs of torque when coupled to the G56 manual transmission, 370 horsepower and 800 ft-lbs of torque when mated to the 68RFE automatic transmission, and 385 horsepower and 850 ft-lbs of torque when coupled with the AISIN AS69RC high output transmission. In order to reach and safely maintain these eye popping power levels, the engine features dual transmission coolers, dual radiators, a higher efficiency inter-cooler, larger capacity EGR system, and a higher efficiency, 11-blade mechanical fan. The engine also offers an active-intake airbox which has the ability of pulling the coolest air around the engine to minimize power-level drop-off in hot weather. This is a great feature to have for those who, like me, live in the desert.

ABOUT THE TRUCK

I prefer to buy my new vehicles before year end in order to get the best pricing. I wanted a short-bed pickup truck with a crewcab and a Single Rear Wheel (SRW), so I was left with a only a half-dozen trucks in the state from which to choose. In order to keep down cost by purchasing a diesel (a $7,995 option), I opted to buy a Tradesman, the lowest trim line offered by Ram. The truck was located in Prescott, AZ, so a dealer trade was required before I could make the purchase. The additional options that came with the truck included a six-speed 68RFE automatic transmission, a 3.42:1 differential, remote start, spray-in bed liner, carpeting, backup tailgate camera, cruise control, power windows, Sirius satellite radio, the fifth wheel gooseneck towing package, chrome grille, and chrome tubular side steps. After rebates and other incentives, total cost out the door was $41,600. Not too shabby and a good $10,000 less than a similarly equipped Ford XLT F-350. My dealer also threw in a lifetime powertrain warranty (an incentive they provide for all of their new vehicles) which really sealed the deal for me.

The 2013 Ram 3500 is a good lookin' truck. The exterior styling is muscular yet sleek and is a significant improvement over Ford's current ugly block styling. Up front, Ram's grille is taller than the company's previous offerings and the front bumper styling is new. The 2013 Ram trucks also feature updated quad lens headlamps, and the Laramie trim (the highest in the Ram lineup) now sports halogen projectors with LED turning indicators. Along the side, engineers improved the truck's appearance by including improved badging and full-length tubular step bars. Around back, new LED tail lights and reverse lights adorn the truck and are a big improvement over the truck's previous hardware. Buyers can also opt for a cab-mounted rear camera to line up a fifth wheel or truck camper when loading, a terrific option I wish my Tradesman had.

Inside, you'll see some nice improvements as well. You won't see anything real fancy with the Tradesman, lots of plastic and cloth seats, but overall you'll see an intelligent layout with all controls easy to reach. The control knobs and buttons are large and easy to manipulate even for those who are wearing bulky gloves. The versatile 40/20/40 front beach seat can accommodate a sixth person by allowing the center armrest to be folded up. The console's center stack features the UConnect 3.0 AM/FM radio with the 3.5 inch Electronic Vehicle Information Center (EVIC) display with the climate controls, trailer brake controller, exhaust brake, and tow haul mode stashed below them. The Borg Warner 4x4 transfer case is floor mounted and easy to reach and shift. Headroom and legroom is abundant and the amount of storage inside is excellent. The rear bench seat can be folded up for additional space and beneath the rear floor mats are two smaller compartments with snap-tight lids where additional items can be stashed out of view. The armrest even opens up for additional storage up front.


With a curbweight of 7,891 lbs, the Ram 3500 SRW short-bed pickup is big. My particular truck measures 19.7 ft long with a width of 79.5 inches and a height of 78.4 inches. The 149.5 inch wheelbase coupled with an improved steel frame featuring wider front rails provides a steady platform for both hauling and towing a heavy load. The only complaint I have with the exterior build is with Ram's 6 foot 4 inch short-bed--it's the shortest in the industry, 3.75 inches shorter than Ford's. This is certainly a negative for truck camper owners who want maximum support for their campers, but with my lightweight truck camper it wasn't a deal breaker for me.

Pickup trucks are made to haul things. Whether it's a load of brick or a 3,000 lb truck camper, the payload capabilities of the Ram 3500 won't let you down. The GVWR of my truck is 11,700 lbs, which after subtracting the official curbweight, yields an official payload of 3,809 lbs, an impressive figure even with the payload robbing options of the crewcab, 6.7L turbo diesel, and 4x4 drivetrain. Fortunately, with my truck camper mounted, I'm still 500 lbs below my rated payload which is what I was aiming for when I first contemplated buying the truck. If that amount of payload isn't enough, you can purchase a DRW long-box with a 4x2 drivetrain for a mind-bending payload of 6,190 lbs.

The towing capabilities of the Ram 3500 are impressive as well. The Ram 3500 comes standard with a 17,000 lb rated Class V tow hitch receiver, a 4- and 7-pin wiring harness, and a built-in brake controller with anti-sway control. My truck, which according to the official Ram literature can tow a whopping 17,160 lbs, pales in comparison to a Ram 3500 regular cab, DRW long-box which can tow an industry leading 30,000 lbs. Impressive! In addition, the aforementioned EVIC allows the owner to electronically pre-program up to four trailers based upon the type of brakes with which the trailer is equipped, thus saving time during set-up. The truck is also outfitted with manual, flip-out side view mirrors to improve visibility when hauling a truck camper or towing a trailer.

The smart brake is one of my favorite features of the truck. Think of it as an exhaust brake with brains. The smart brake uses a sliding-nozzle turbine design, like Cummin's previous offerings, but it's now controlled by a more sophisticated software mapping program. This new software effectively allows for three different settings, all controlled by a single button located on the lower switch panel on the center stack. A single push of the button engages the exhaust brake into the standard, least aggressive exhaust brake mode. A second push of the button engages the smart brake or auto mode, which employs a more stringent and aggressive mapping configuration. According to the owner's manual, the smart brake will "automatically provide a variable amount of engine braking in an attempt to maintain a constant vehicle speed." The smart brake target speed is set when either the truck's brake or the gas pedal is released. A third press of the button turns the exhaust brake off.

A total of 45 safety and security features have been built-in to the Ram 3500. These include advanced multi-stage driver and front-passenger air bags and seat-mounted side pelvic-thorax air bags. The truck also features standard Electronic Stability Control (ESC) technologies, including all-speed traction control, trailer-sway control, hill-start assist, and Anti-lock Brake System (ABS). The truck is also equipped with the Enhanced Accident Response System (EARS). This system makes it easier for emergency personnel to see and reach occupants in the event of an accident by turning on interior lights and hazard flashers, unlocking doors after air-bag deployment, and shutting off the flow of fuel to the engine.

The fluid and tank capacities of the 2013 Ram 3500 are pretty standard for a one-ton truck. My short-bed truck came with a 31-gallon fuel tank. If you buy a long-bed model you'll get the slightly larger 32-gallon tank. The oil capacity of the Cummins 6.7L inline-six is 12 quarts. Fortunately, the oil-change interval has been pushed out from 7,000 miles to 15,000 miles thanks to the aforementioned diesel particulate filtration improvements.This is good news for owners, but it also means you need to keep your eight-gallon DEF reservoir topped off rather than waiting for your next oil change. I'm told that the DEF should last 8,000 miles, but I've never achieved that figure. I can usually go 4,000 miles before I need to refill it. Fortunately, an analog DEF level meter is located on the dash where you can see at a glance what your current DEF levels are.

HOW IT PERFORMS

So how does the Cummins 6.7L turbo diesel perform in real life? Well, thanks to the EPA's more stringent emission standards, the truck's fuel economy isn't what it could be. Still, it's pretty impressive for a truck weighing close to four tons. Ram engineers claim that a 10% improvement in fuel economy was achieved in 2013 using the DEF system. Unloaded, I'm able to get 21 mpg on the freeway doing 60 mph, while hauling a 3,000 lb truck camper at the same freeway speed I can average 14 mpg. City driving without the camper I can consistently get 16 mpg. Again, these figures are pretty dang good for such heavy duty truck, but a bit disappointing in light of the new federal regulations. Hopefully, engineers can develop the technology in the coming years to improve fuel mileage yet stay within the new federal guidelines. And speaking of these new guidelines, there's no doubt that having to keep the DEF reservoir topped-off places an additional burden on diesel ownership, but there's also no denying that the 6.7L turbo diesel burns cleaner and produces zero smell compared to old diesel engines.

The handling of the 2013 Ram 3500 is pretty impressive. Compared to other heavy duty trucks I've owned and test driven, the 2013 Ram 3500's ride is silky smooth and quiet. The 68RFE six-speed automatic transmission shifts smoothly and efficiently, though on rare occasions it can be a bit jerky when descending at low speed. The steering is effortless on the highway with no wandering whatsoever, and the truck screams up steep mountain passes like a bat out of hell even with the 3.42:1 differential. The smart brake works exceptionally well in keeping the truck's speed in check when descending down steep mountain passes, though I wish the button to access it was easier to locate in a pinch like on the steering column. One characteristic I really like is that the truck can practically turn on a dime. This really comes in handy when parking and doing U-turns and on heavily-wooded mountain trails that suddenly come to a dead-end.


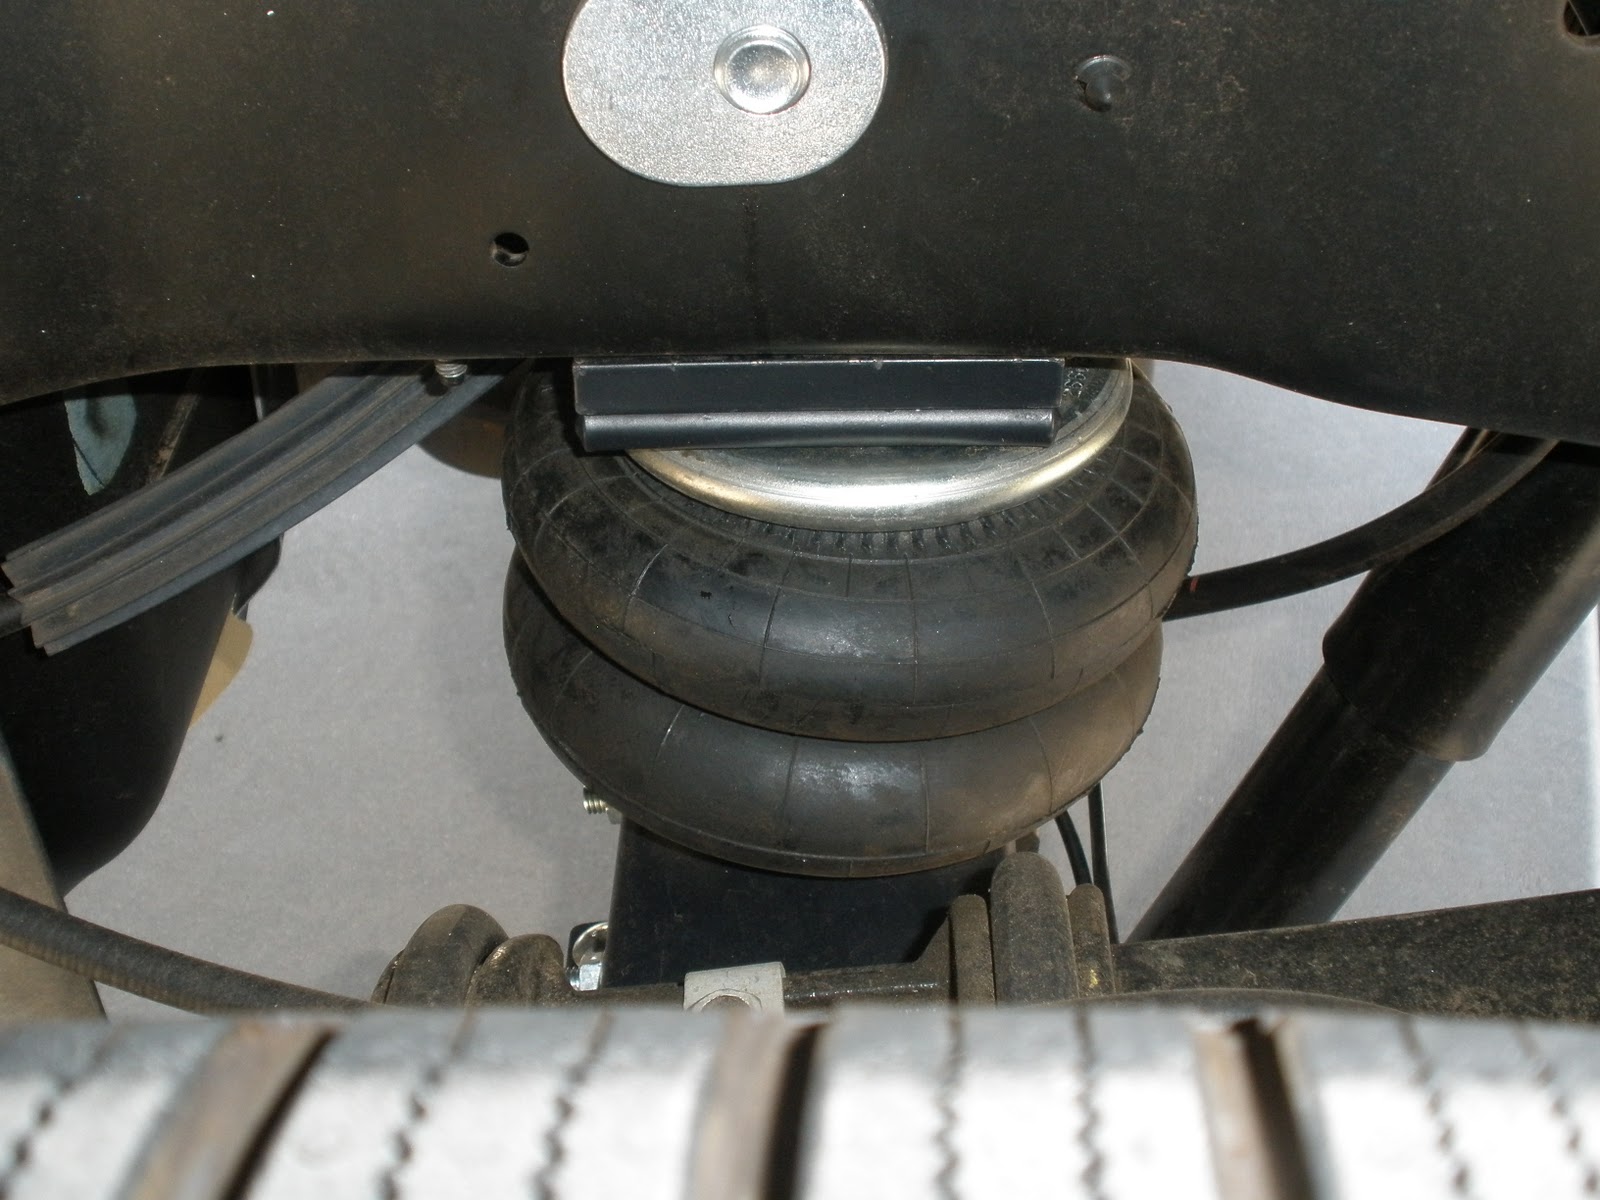
As for the ride, the 2013 Ram 3500 gets an excellent grade. I found the ride to be firm and free from any jiggling and jarring. With my camper mounted, I did experience some roll on turns and winding mountain passes, but I was able to alleviate this by installing a Hellwig Big Wig rear sway bar (the Ram 3500/2500 comes with a factory front sway bar only). Surprisingly, the OEM shocks work well and don't require an aftermarket upgrade to Bilstein or Ranchos. As expected, the truck's heavy duty leaf springs handle my 3,000 lb truck camper with ease with zero sag. How does the truck perform on long road trips? Very well. Long drives of 8 hours can wear you out, but I found driver fatigue to be minimal after driving the Ram 3500. Overall, the truck is fun to drive and has proven to be very dependable--not one visit to the dealer has been required in the 12 months I've owned it.

In conclusion, you can probably tell that I really like the Ram 3500. Fortunately for me, the switch from Ford to Ram was pain free. It's true that there are a few aspects about the Ford heavy duty trucks that I like better, but in my mind, the Ram trucks fare better overall, primarily because of the reliable Cummins turbo diesel. The Cummins engine was reason enough for me to go with Ram in the first place. The fact that Ram produces a quality truck that is significantly lower in cost than a Ford was just icing on the cake. Fortunately, with the Ram 3500 pickup truck, you can have your cake and eat it, too.

Note: This is an independent review. I do NOT get paid to review products on this website. I will only recommend products in which I use and believe in and which I think will benefit my audience. The views expressed in my reviews are personal views and are written without any influence, whatsoever. That said, I reserve the right to engage in paid affiliate marketing and promotion with brands, companies and individuals whose products I review. 
Viewing all 66 articles
Browse latest View live


Latest Images