Quantcast
Channel: Mello Mike's Overland Adventures
Viewing all 66 articles
Browse latest View live

RV Refrigerators: How Level Should They Be?

$
0
0
There's no doubt about it. RV boondocking wouldn't be half as fun without the creature comforts provided by today's modern RV. The gas/electric refrigerator plays a big role in these comforts. Unfortunately, it's poorly understood by a vast majority of RV owners. One question I often see online is, "how level should my gas/electric refrigerator be when I'm camped?" I will address this question and a few others in this short article.

First, it will be helpful to understand a little about how the gas/electric refrigerator works. Cooling is accomplished using ammonia, water, and hydrogen gas. When propane (or electric heat) is applied to the refrigerator's boiler the ammonia turns into a vapor and rises to the condenser fins at the top of the refrigerator. Here the ammonia vapor cools and turns into an ammonia liquid (the more liquid the better the refrigerator will cool). Once the ammonia liquid is created, gravity drops the liquid down into the evaporator coils inside the refrigerator's cooling unit, where, along with hydrogen gas, the cooling process takes place. There are additional steps in the refrigeration process, of course, but the most important elements--heat, airflow, and gravity--have been addressed. For the purposes of this article, we'll take a look at gravity only.

As mentioned, gravity is critical to the RV refrigeration process. Without it the ammonia liquid will not properly flow to the evaporator coils to cool the refrigerator. Having your rig off level not only disrupts the proper flow of the ammonia, but it also allows ammonia crystals to form inside the refrigerator's tubing. Over time, these crystals accumulate until flow is restricted or blocked. The problem with these crystals is that no amount of vibration will cause them to dissolve--they are permanent--like plaque inside our arteries.

So to answer the question, "how level should your refrigerator be?" Well, fortunately, today's refrigerators have greater tolerances than those owned by our parents or grandparents. Their RVs had to be almost perfectly level to operate well. Today, Norcold recommends that their refrigerators operate within 3 degrees off level side-to-side and 6 degrees off level front-to-back. What does this mean for you when leveling your rig? Half a bubble on your RV level should be good enough for an overnight stay, but if I'm going to be boondocked for several days or a week at the same location then I like to get my rig as level as possible. Taking a few extra moments to properly level your rig will enable your refrigerator to cool better and last longer by preventing ammonia crystals from forming.  

What is the best way to level an RV? Well, if you're lucky enough to have electric or hydraulic automatic levelers, that's the best and quickest way. But if you're like me you have to resort to more primitive methods. Truck camper owners are limited to air bags, leveling blocks, and power jacks to level their rigs. Of these, I prefer to use leveling blocks. As a proponent of the KISS (Keep It Simple Stupid) method, I think a good set of leveling blocks is the quickest and easiest way to level your rig. Just don't forget to pick them up before leaving your campsite. As for what to use as leveling blocks, it really doesn't matter. Some like to make their own out of scrap pieces of wood, while others, like me, prefer the use the plastic "Lego" style of leveling block. You can buy a set of 10 with a storage bag, like those sold by Camco and Tri-Lynx, for around $30.


Moving and Getting Sick

$
0
0
Wow, things have been crazy busy at the Mello Mike household lately. In December, we moved into our new home and my oldest son and his wife had their first baby (yes, I'm now a Grandpa). The holidays, of course, are always busy with family gatherings, and we've been busy unpacking, organizing the new household, and getting rid of stuff we no longer use. After a terrific five day visit to Quartzsite in late January, I got hit with a cold that soon turned into a bad case of bronchitis or whooping cough. I've had it four weeks now. The chest congestion, which at first was awful, has gone down quite a bit, but I still get intense fits of coughing that make me light headed. In fact, a few days ago I ended up passing out during one coughing spell and fell and hit my head. I had to get staples in the back of my head for the deep gash and was admitted to a local hospital for overnight observation. I'm told that bronchitis can last 6 weeks and whooping cough 3 months. I'm still not sure which I have. The doc said Bronchitis, but the coughing resembles whooping cough more. I hope it's not whooping cough. We have some trips planned that I've had to put on hold while I recover.

Anyhow, that's why I haven't posted any trip reports lately. Moving and getting sick can put a big damper in activities. In meantime, I thought I'd show everyone our new homebase. It's a four bedroom, two bathroom house with a two car garage. No HOA. There's a gated, side parking area large enough to accommodate a large RV, plenty big for our small truck camper. Unfortunately, there are no electrical outlets and water spigots on the side where the RV parking is located, so I'll need to do something about both soon (look for a 30 amp installation here on this blog). I may also have to erect some kind of covering on that side of the house to protect the camper.

The gated parking area for Wolfy.

One big reason why we bought this particular house was for the location. It's located in east Mesa, just a few miles from the Usery Mountain Regional Park, the Superstition Mountains and the Apache Trail, and the Salt River Recreation Area. The Tonto National Forest and the Four Peaks Wilderness Area are close as well. We're about 2 minutes from the 202 freeway and maybe 10 minutes from the 60 freeway. Easy access for long distance traveling. There are even a few RV dump stations nearby where you can dump your tanks for just $5. Hopefully, we can get out soon in the camper and do some exploring. 

Goodbye, Stinky Slinky. Hello, RhinoFlex!!!

$
0
0
It was like a scene out of the Robin Williams comedy film, RV. We had just completed a big weekend camp-out with family and friends. Everyone had used our bathroom over the weekend, so the waste tanks in our camper were full, really full. I had already located a great dump site on Sanidumps.com and had made a beeline to it after leaving the campsite. I paid the fee, pulled up to the dump station, and got out to do the dirty business that all RV owners hate.

The afternoon temperature was 93 degrees, not exactly balmy, but tolerable. With the three-hour drive home ahead of us, I wanted to get this nasty business done and over with quick. I put on a set of disposable gloves, pulled out the Stinky Slinky sewer hose, and hooked it up to the camper's dump outlet. After inserting the other end of the hose into the dump station's sewer inlet, I walked back to the camper, reached into the dump valve access port, and yanked up on the handle to the black tank dump valve. A split second later the welcome sound of rushing water was heard as the sewage began draining into the sewer inlet. So far, so good.

Three or four minutes later the black tank was close to emptying out. At this point the flow rate had slowed down quite a bit, so I lifted the hose to help move the sewage along. I was in the middle of doing this when, to my horror, it happened--Mr. Slinky pulled loose from the bayonet fitting and flopped straight to the ground. With it a gallon or two of the nasty, foul smelling liquid hit the asphalt and splashed up on my legs and my feet. With sewage still pouring out of the dump outlet and a few choice words blurting out from my mouth (insert your choice of expletive here), I frantically grabbed the end of the hose and successfully reattached it to the bayonet fitting. Robin Williams would've been proud. But, alas, the damage was done. My ego was bruised and my shoes were soiled. Mr. Slinky had beaten me again.

Yep, this wasn't the first time. I had a similar run-in with this sinister hose back in 2010. In each case the point of failure was the bayonet fitting. The main problem is the bayonet fitting's design. The portion of the fitting that slips inside the Slinky is smooth. There's nothing for the hose clamp to grab onto when it's tightened over the fitting, so no matter how tight you get it the hose can pull away from the fitting with a good tug or twist. This is especially true when the hose is fully extended and full of waste water like it was for me during this latest mishap. I checked the tightness of the clamp before I used it this time around and it was snug as a rug, but it made no difference. A better solution than the troublesome, unreliable Stinky Slinky had to be out there and I was determined to find it.

Mr. Slinky before being relegated to the trash heap.

Fortunately, I did. The good folks at Camco make what they call the RhinoFLEX 15' Sewer Hose Kit, a patented RV dumping system with specially engineered hose fittings to prevent mishaps while dumping. The RhinoFLEX sewer hose is sold as a complete kit with everything you need to dump your RV's waste tanks. The kit includes a 15-ft hose, a swivel bayonet adapter, a 4-in-1 translucent elbow (yes, you can view the waste through the elbow while dumping), two locking rings, and two storage caps. The translucent elbow comes with a detachable adapter that fits all dump-station inlet sizes, including 3-inch slip or 3, 3-1/2 and 4-inch. Camco sells kits with hose lengths of 15 ft and 20 ft. The best price I could find online for the RhinoFLEX 15 ft version was $28.00 through Amazon.com.

When you first remove the RhinoFLEX hose from the box, it looks like your normal, everyday Stinky Slinky. Unlike the others, however, the RhinoFLEX hose "clicks" into the shape you want and remains rigid, meaning it can be extended or compressed like an accordion and can hold it's shape when bent like a drinking straw. No other sewer hose on the market can do this. For storage, the 15-foot-long hose compresses to an amazing 56-inches with the end fittings or 43-inches without them. Need additional length? No problem. Extension kits can be purchased in 5- and 10-ft lengths. Need a shorter hose for those extra short storage tubes like the one on my truck camper? Cut it to the length you need.

The RhinoFLEX end fittings are well-made and offer some neat, innovative features. The fittings are reverse threaded and are attached by rotating them onto the hose in a counterclockwise fashion. The locking rings, which are placed onto the hose first, are also threaded and are tightened by turning them clockwise until the locking tabs on the ring engage. Together, the two result in a hose connection that won't fail during use. Moreover, each fitting is designed so that they can swivel a full 360 degrees while connected, thus if any adjustments to the hose needs to be made while you're dumping you can do so confidently without mishap. I should note that the fittings come greased from the factory and that you'll need to grease them periodically to keep them limber and loose.

RhinoFLEX sewer hose (4-in-1 adapter & caps not shown).
Closeup of RhinoFLEX bayonet adapter with locking ring.
Plastic container where I store the 4-in-1 inlet adapter.

Are there any negatives with the system? I can think of only two. First, because of the size of the end fittings you'll need a storage tube with a 4-inch diameter to store it. Unfortunately, not all RV's have a storage tube with a diameter that large, so you'll need to either remove the fittings or find another place in your RV to store it. Second, the removable 4-in-1 inlet adapter is too bulky to fit in a standard 4-inch storage tube. This means you'll need to detach it from the translucent elbow and store it in another location. This can be a pain, for sure, but it is what it is (I store mine in a small plastic container with a lid). As you can see, neither issue is what I would call a "show stopper" and in no way detracts from what I think is an outstanding product.

How well does the RhinoFLEX actually work? I've been an RV'er for 12 years and the RhinoFLEX is simply the quickest, easiest, most sanitary dumping system I've ever used. The bayonet adapter attaches easily to my camper's dump outlet and stays firmly secured while in use. The hose is flexible, yet firm, and holds its shape no matter how much waste water is rushing through it; no need to place a large rock on the inlet side of the hose to keep in in place. The translucent elbow allows you to see the rate of flow at a glance and helps take the guesswork out of dumping. The hose is easy to clean and compress, while the storage caps make storing the RhinoFLEX a joy, no more messy spills while placing the hose in the storage tube. I can't say enough good things about the RhinoFLEX. My only regret is that I didn't buy one years ago. It works that well.

The RhinoFLEX in action.

Now you may think it's lame for an experienced RV'er to get excited over a sewer hose. I can understand that. But the simple fact of the matter is that if you own an RV, waste tank dumping is an smelly, unfortunate fact of life that we must all do. Wouldn't you rather dump confidently each and every time without worrying about an embarrassing Robin Williams mishap? If you're still not convinced that the RhinoFLEX system is for you, check out the reviews on Amazon.com. Hundreds of testimonials have been written by RV owners stating that it's a superior product. So if you want a clean and reliable RV dumping system, and you're tired of Mr. Slinky getting the best of you, give the RhinoFLEX system a try. Your ego and your shoes will thank you.

Disclaimer: I'm an independent reviewer. I do NOT get paid to review products on this website. I will only recommend products which I use and believe in and which I think will benefit my audience. The views expressed are my personal views and are written without any influence, whatsoever. That said, I reserve the right to engage in paid affiliate marketing and promotion with brands, companies and individuals whose products I review. 

11 Benefits of Truck Camper Ownership

$
0
0
For consumers looking to buy a new RV, most never consider a truck camper and I think that's a serious mistake. Today's truck campers possess the same accouterments as the finest motorhomes and fifth wheels found in today's market. Indeed, some hard-side, long-bed truck campers offer large dry baths and sport as many as three slide-outs to increase living space. Most are also quite spacious and roomy and offer large kitchenettes and full-size queen beds. If you haven't been in a truck camper lately, you need to do so. You may be surprised at what you see.

Aside from the standard creature comforts, the truck camper has much to offer the consumer. Like other RVs, truck campers come in various sizes and styles including long bed and short bed models, hard side and pop-up models, as well as slide-out and non slide-out models. You'll need a one-ton dually for the heavy, multiple slide-out models, but the smaller pop-up campers can easily be hauled by a half-ton pickup truck. Got an even smaller truck? Pop-up truck campers can also be purchased for the Ford Ranger, Chevy S10, and Toyota Tacoma.

In spite of the differences between hard side and pop-up models and slide-out and non slide-out models, the truck camper has a common heritage with numerous things in common. These commonalities are what we'll examine in this article. It's also hoped that this article will explain why the truck camper makes such a great RV and will help buyers make a more informed decision. Now let's take a closer look at the eleven benefits of truck camper ownership. 

1. Unmatched Versatility:

Without a doubt, the truck camper is the most versatile RV on the market. The combo provides a rock-solid platform for towing things like Jeeps, trailers, and boats. But that's not all. The fact that you can unload the truck camper from your pickup truck allows you to not only use your truck as a daily driver at home, but also gives you the ability use it on outings for things like four-wheeling, collecting firewood, or taking your boat to the lake. No other single RV on the planet can do all of these things like the truck camper can.


2. No Registration or Insurance Fees:

Did you know that 39 states still classify the truck camper as cargo rather than an RV? It's true. That means if you live in those states you won't have to pay annual license and registration fees. Insuring a truck camper is cheaper, too. There's no need to individually insure it, your auto insurance policy will cover it when it's mounted to your truck, while at home it will be covered by your home owner's policy. Just make sure you don't go over your truck's GVWR as this could void your coverage. As you can see, owning a truck camper can save you hundreds of dollars a year in insurance, fees and taxes.

3. Superb Maneuverability:

The maneuverability of a truck camper is hard to beat. The compact size of the truck camper coupled with the small turning radius of the pickup truck means you can maneuver out of trouble much easier than with towable RVs and large motorhomes. The size and maneuverability of this combo also means you can park practically anywhere in town--you won't need to take up 15 parking spaces at the back of the parking lot just to go shopping or eat at a restaurant. It also means that you can park in small, national forest campgrounds and negotiate steep and narrow mountain switchbacks. Due to its superb maneuverability, there are few RV's I would rather be in when exploring unknown roads and new territory than the truck camper. 

4. Easy to Drive:

If driving a large motorhome or pulling a massive fifth wheel or travel trailer intimidates you or has lost its appeal, then you'll love driving a Truck Camper. Owning a truck camper means you won't have the hassle of hooking up a trailer hitch and anti-sway tow bar before leaving on your trip. Not only that, but you won't have to worry about fish-tailing on the freeway from heavy winds and passing semi-trucks, nor avoid inattentive drivers merging on the interstates. Both men and women enjoy the ease and simplicity of driving a truck camper. In fact, it's really no different than driving a regular pickup truck. My wife, who would never take the wheel towing a travel trailer, enjoys driving our truck camper.
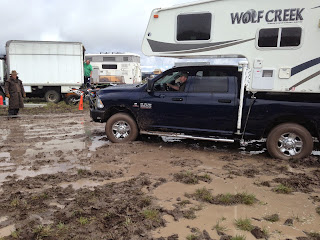
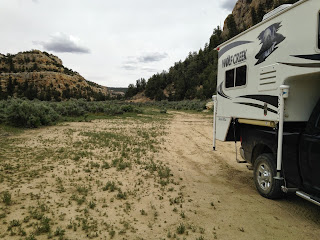
5. Outstanding Boondocking Capability:

If you like to explore and boondock far off the beaten path, then the truck camper is one of the best options out there. Why? Well, the compact size and two-axle configuration means you can go places where the typical large RV can't. Add the go-anywhere capability of a 4x4 pickup truck mated with a pop-up truck camper and you'll be able to go practically anywhere your heart desires. Travel down remote, narrow forest roads on the North Rim? Sure! Climb steep hogbacks in Moab, Utah? No problem! Spend a few weeks at Quartzsite during the winter? Absolutely! When you own a truck camper the world is at your doorstep.  

6. Cheaper to Maintain:

With no towing or running gear, the truck camper is the cheapest RV to maintain. If you've owned a travel trailer or fifth wheel before, you know the time and cost involved in maintaining the tires, bearings, and brakes. It can be a major pain. With the truck camper all you need to do is maintain your truck as you normally would do with periodic servicing. Yes, it's true that the camper itself will need periodic maintenance as well, but in the long run, you'll spend much more time enjoying your truck camper rather than working on it. Always a plus in my book.


7. Better Fuel Economy:

With the cost of diesel fuel and gasoline in today's economy, every mile counts. On average, truck campers get better fuel economy than the typical RV. Indeed, most truck camper owners are realizing anywhere between 10 to 15 MPGs (my 6.2L V8 gas engine with a 3,000 lb camper typically gets a little over 12 MPG). Low profile, pop-up truck camper owners realize even more savings by using a diesel pickup truck to haul their camper. Some diesel owners have claimed as much as 20 MPG hauling around a light-weight, pop-up truck camper! Try getting those numbers with another RV. It isn't going to happen.

8. Easy to Store:

The compact size of the truck camper means that storing it will be less of a hassle. Most of us live on small lots of one-third of an acre or smaller. This means that a small RV like the truck camper will be much easier to store than a massive fifth wheel or Class A motorhome. Still, if storing an RV on your property isn't possible due to HOA regulations or other limitations, then storing a small RV like a truck camper means you won't have to pay as much for storage fees. Oh, and one more thing. Unmounted truck campers are much more difficult to steal than other types of RV's. Just make sure you store the electric jacks remote and electrical umbilical cord separate from the camper.

9. Great Bug-Out Vehicle:

Need emergency shelter due to an approaching storm, fire, or flood? No problem with the truck camper. The amenities and compact size of the truck camper means you'll have all the essentials you'll need to get you and your family through an emergency. If you think a truck camper is too small. Think again. You can easily survive a couple weeks in a large, solar-powered truck camper stocked with food, water, and fuel. In most cases two weeks is more than enough time for the trouble to pass. The small size of the truck camper also makes it more stealthy in a bug-out scenario compared to other RV's and more likely to avoid unwanted attention. This means it can be parked practically anywhere including an empty lot or family member's driveway. 
 
10. Upgrade and Maintenance Independence:

Since the pickup truck and camper are two separate units, upgrading one or the other is much easier. Need a bigger pickup truck with more payload and 4x4 capability? Then get one. Want a bigger truck camper with a slide-out and more room? No problem, buy it. This versatility when it comes to upgrading doesn't exist with the motorhome--it's all one unit. One other thing about the truck camper. The fact that the truck and camper can be separated also means that taking one to the shop is much easier; you can still use one while the other is at the shop. Nice!


11. Excellent Depreciation Value:

The versatile truck camper holds its value much better than the typical RV. Why? Two things: the smaller niche truck camper market and the fact that truck campers are built better than your typical RV. Most truck camper manufacturers are industry leaders in quality, design, and innovation and often customize their products to meet the requirements of each individual truck camper owner. This quality and attention to detail means a better product for you that will provide many years of quality service.

These are the primary benefits of truck camper ownership. There are certainly others, but these are the ones that really standout above the rest. Is the truck camper for everyone? Of course not. Full-timers who need more living space and those who have physical limitations won't like what the truck camper has to offer. But the truck camper does provide unmatched capabilities and benefits that can't be beat by other classes of RVs. So if you're thinking about buying an RV, give serious thought to the versatile truck camper. It might be one of the best decisions you've ever made.

A special thanks to Northstar Campers, Jim Caruthers, Randy B. (Ramlinwillie), John M., Dave Rogers (Whazoo), Jim W. (Boatycall), and Laurie Heimbigner for permission to use their photographs.

Torklift International Announces Changes to the Turnbuckle Line

$
0
0
SUMNER, Wash., —Torklift International altered the most popular FastGun turnbuckle by design of its handle and introduction of an additional finish.

“From customer feedback and further testing on the original FastGun turnbuckle handle that allowed rounded openings for fingers to grip onto, the value of altering the design was significant enough to make the change,” said General Manager Jay Taylor.

The new handle on FastGun turnbuckles has a sleek design modeled after a pistol grip and is ergonomically easier to use. As Torklift shifts to greater use of lighter weight materials, the FastGun handle is made from aircraft grade aluminum too.

“Upon further market research, Torklift has added a new finish and discontinued an older finish,” said Taylor. “The new high impact powder coat in “Bright White” matches the newer design of truck campers that are coming out. It’s a brighter, bolder white.”

The previous finish in white matched a former trend of truck campers that were slightly off-white. The new “Bright White” color matches newer campers.

The Long Range FastGun turnbuckle part number S9523 in white is being discontinued.

The new “Bright White” finish is part number S9530 and is currently available in the Long Range design. Other finishes of stainless steel polish, high impact powder coat gray and black are still available.

With the current changes in Torklift’s turnbuckle line, the legendary lifetime warranty stays the same.

Extended warranty coverage of truck frame and camper anchor points applies when Torklift Frame-Mounted Tie Downs are used with spring-loaded turnbuckles on all four points of the camper.

“When you’re riding with Torklift, you’re riding with confidence in nearly 40 years of engineering experience, superior quality and our legendary, trend setting, first-to-market designs,” said President Jack Kay.

Torklift International turnbuckles come with a legendary lifetime warranty. For warranty details call 800-246-8132. “We believe that the best way to assure true, steadfast confidence is a warranty that keeps the manufacturer riding with you for an entire lifetime,” said Kay.

Visit www.torklift.com for more information and view this demonstration video for details on Torklift International turnbuckles: https://www.youtube.com/watch?v=5ZNyocP_e6w

Torklift International is a Sumner, Washington-based manufacturing company. They produce aftermarket parts for the RV and automotive industries. Products are backed by their legendary lifetime warranty and proudly made in the USA. Founder Jon Kay established Torklift International in Kent, Washington. Torklift International was named 2013 Best Mid-Sized Company to Work For in Washington State. 

RV Black Holding Tank Cleaning Tips

$
0
0
We RV'ers have a love-hate relationship with the black tank in our RVs. We all love the convenience of having one to do our business, but hate the smell and cleaning associated with having one. Not only do we have to put up with the unpleasant smells, from time to time, but we also have to deal with the level sensors which often get caked with "stuff" which give erroneous readings (you KNOW the tank is basically empty, yet it reads completely full). In order to deal with these and other black tank issues, here are a few tips that I've learned along the way.

After emptying your blank holding tank, place at least a couple gallons of fresh water in it along with the tank treatment of your choice. In my experience the additive you place in your tank doesn't really matter all that much, they all work about the same, despite their many claims. As for the toilet paper, you can not only use standard RV toilet paper, but also cheap household one-ply brands marked "septic safe" or Scotts Extra Soft two-ply toilet paper. These household brands dissolve just as well as standard RV toilet paper and often cost much less. If you don't believe me, perform your own test by placing a couple sheets of toilet paper of your choice as well as RV toilet paper in two separate glasses of water and shake. Both should dissolve at about the same time.

Keeping your tank fresh and clean smelling and ensuring that your level sensors read properly is not that hard. After emptying your black tank, add a cup of Tide dry granule washing machine detergent (with no bleach) and a couple gallons of water. After doing this drive a hour or two, making sure that all the contents in the tank get mixed up. After doing this, dump your black tank again. Don't forget to place two gallons of water and your favorite tank treatment back in the tank after you're finished. If you don't have a box of Tide detergent handy, use a bag of ice cubes instead. I've never used ice cubes to clean my black tank, but many RVers swear that it's just as effective.  Clean your tank as often as needed.

Tide cleans your black tank as well as the sensors.
My Wolf Creek Camper after taking a dump.
Valtera gray tank dump fitting.

Here are a couple tips to remember when dumping your tank. First, make sure you wear disposable gloves while dumping your tanks, keeping a supply of gloves handy near your RV's dump station. Before attaching your slinky to your RV, make sure that the clamp fitting that tightens the connector to your slinky is tight. I've seen these detach at dump stations and it isn't pretty (the look on RVer's faces when this happens tells the story). You'll also want to make sure that the other end of the slinky hose is secured to the drain with either a rock or brass lid. Doing this ensures that when you open the dump valve the slinky doesn't lift up and leave a big mess around the dump station and on your shoes. When emptying your tanks, dump your black tank first (the larger diameter pipe), then your gray (the smaller pipe of the two). Doing this cleans the nasties out of your slinky with relatively clean gray water.

Show proper etiquette when dumping at public facilities. If there is a long waiting line, do your business as quickly as possible, then leave. But before you do so, clean the area with fresh water (most dump sites have a hose and fresh water to do this). If you need to wash your hands or do some other cleanup, pull your RV up, so others can begin dumping.

If you have any tips of your own, I'd love to hear from you.

In Search of a TJ Jeep Wrangler

$
0
0
What, Mike? Another Jeep Wrangler? Yep. Last year I sold my 2004 Jeep Wrangler in what turned out to be a big mistake. That '04 was practically cherry with only 55,000 miles on it. The wife wanted something that was easier to drive on the highway and got better gas mileage, so I sold it and bought her a Jeep Compass. In retrospect, what I should have done is kept the old Wrangler and bought her her own car. I was trying to be wise and frugal and and not own three vehicles. So here I am one year later in search of another Wrangler.

Like my last, I'm looking for a TJ (a Wrangler built between 1997 and 2006). I'm looking for a Jeep that is clean, well taken care of, with no more than 150,000 miles on it. It has to have the bulletproof 4.0L Inline 6 engine, AC, hard doors, and a back seat. The color doesn't really matter, but I do like the Sahara trim line with the matching color fenders and two-tone seats. I would also prefer to have a Dana 44 rear axle though this isn't what I would call a "deal breaker."

Last time I bought my Wrangler at Sullivan Motors, a local used car dealership that specializes in used Jeeps. You can find some great Jeeps going this route, but you'll generally pay more and that doesn't even include the sales tax which will tack on an additional $1,200.00. This time I'm going with a private seller via Craigslist. Patience is the key when shopping for a used Wrangler, especially in Arizona as TJs are very popular. The good deals go fast. "You snooze, you loose" applies. Unlike last time, however, I'm willing to travel to get the right Jeep at the right price. I'm trying to stay below $10,000, but I'm willing to pay more for the right Jeep. 

The bulletproof 4.0L Inline 6 engine routinely gets 300,000 miles.

For the benefit of those who may be looking for an older Jeep like me, here are a few things to be aware of regarding the 4.0L Inline 6 engine. The first thing to look for is a cylinder head with the 0331 casting. These troublesome heads were used quite a bit on Jeeps in 2000, but can also be found in 1999, 2001, and 2002. Any kind of overheating incident will crack them (usually between the 3rd and 4th cylinder). It's just something to be aware of. In addition, the exhaust manifolds in certain years are prone to cracking, too. These troublesome manifolds are found only in models before 2000. After market kits can be purchased to replace the faulty OEM manifold, but you can also repair the existing manifold by taking it to a welder.

The search for another Wrangler is on. Wish me luck. Oh, if you happen to know of one nearby, let me know. 

Found: One 1998 Jeep Wrangler

$
0
0
Well, here she is. After looking for several weeks I found this TJ on Craigslist the same day she was listed. She's a 1998 Wrangler Sport with 106,900 miles on it. She has the 4.0L Inline 6 engine, a 5 speed manual transmission, AC, full doors, and a black hardtop. The blue-gray color, I believe, is called slate blue. The body and paint are in excellent condition with a few minor scratches, nothing major. Likewise, the interior is in pretty good shape though she will need new carpet (a carpet kit from Stock Interiors is on order and should arrive next week). I spent $8,400 on this TJ which is well below my planned spending limit of $10,000.

I've spent the last few days cleaning her up and ordering a few minor parts that were needed. She was really in need of a good bath inside and out. I also had her serviced with new oil, performed a brake fluid flush, repaired a tire that had 2 nails in it, and cleaned the filthy K&N air filter. The badly faded plastic fenders needed some work done to them as well. I tried using tire shine on them to restore them to their original black finish but after a day they looked gray and dull again. After doing some research on what other Jeepers have done, I applied some direct heat to them (a heat gun or a propane torch work well for this). I've also ordered a complete set of Rugged Ridge floor mats. I had these in my last TJ and I really liked how well they fit and how well they held up.

What are my planned mods? I've already ordered a Bulldog bumper for the front and will eventually get a winch and PIAA lights to mount on it. I'll also wire her up for towing behind the truck and camper. I'm planning on a small lift (either 1.25 or 2 inches), size 15 wheels, and size 33 tires. I'm leaning toward a set of Cooper AT3's but I haven't ruled out a set of Mickey Thompson's or a set of Goodyear Wrangler Duratracs. These mods should be a lot of fun, but they're also expensive. So I'll have to take baby steps and build her out over time. Stay tuned.

What she looked like when I first inspected her.
Restoring the plastic fender with a butane torch.


10 Craigslist Dos and Don'ts for Selling Cars

$
0
0
It seems like everyone has an opinion about Craigslist, the popular website for buying and selling. You either love it or hate it. I'm in the love it camp. It's free, easy to use, and is accessed by millions of people everyday (60 million per month in the US alone). Sure, you can find scammers and shady people on the site, but that's the exception rather than the rule. The overwhelming majority of craigslist users are honest and trustworthy.

I've been a steady Craigslist user for nearly 10 years now and have sold and bought countless items on it, including a dozen RV's and cars. After the recent sale of my 2011 Jeep Compass and the purchase of a 1998 Jeep Wrangler, I thought I would present my thoughts on what works and doesn't work when selling a vehicle on Craigslist--the dos and don'ts. This advice is needed because it's obvious that some are clueless and have no idea what they're doing. Fortunately, being good at selling on Craigslist isn't rocket science, but it does take a little effort to prepare an effective ad that will get the attention of prospective buyers and gain their trust. While the main focus is on selling cars and trucks these tips are equally applicable to selling RV's. So without any further adieu, here are my 10 dos and don'ts for selling a car and truck on Craigslist.

1. Do provide meaningful photographs. 

I've lost count on how many ads I've seen that have no pictures or just one or two exterior shots of the car and that's it. Nearly everyone nowadays has a smartphone with an HD camera. Use it and take several exterior pictures of the vehicle and don't forget to take a few of the interior as well. In addition, get a pic of the odometer reading (buyers like to see proof that what you're saying about the mileage is truthful). Be sure to snap pics of any damage. Oh, and please ensure that the photos you choose are clear with good lighting and are presented professionally in your ad (not sideways or upside down. Yep, this is pretty common).

2. Do list your vehicle for a fair price.

What's a fair price? Go to one of the car appraisal websites like Kelley Blue Book, NADA, or Edmunds and get one. If you don't take the time to perform this simple step then you probably won't be able to sell your car. One guy who lives here in Phoenix is currently asking $4,000 more for his Jeep than the current Blue Book price. That's insane. Guys (and gals) who do this are probably the same ones who wonder why their car hasn't sold after having it listed for over two months. Hello! Nobody is going to pay over the blue book price for any car unless it's in unbelievable condition and loaded with options and extras.

3. Do provide a detailed write-up.

I often come across ads that provide only a brief sentence about the car and that's it. Buyers want to see information that will help them weed out the good cars from the bad. You don't have to write a book, but it does help when sellers provide a good paragraph of information about the car's features and history. Oh, and use the data fields that Craigslist provides for selling cars. These fields provide valuable info like year, mileage, condition, and number of cylinders, and are used extensively by prospective buyers when conducting vehicle searches.

4. Do detail your vehicle.

Several years ago my wife and I looked at a filthy, unkept car that still had fast food wrappers and old french fries on the backseat floor. It was obvious the car wasn't touched before the fool showed it to us. Needless to say, we passed on that car. Oh, and the Jeep I bought last week wasn't detailed either. It had bird crap on the hood and dog hair still embedded in the carpet. I was able to look past these annoyances to see the positives, but there's no doubt I would've paid a little more if the guy took the time to make the Jeep more presentable.

5. Do provide good contact info.

Believe it or not, I've seen ads with no contact info listed. Hello! Nobody can respond to your ad without a phone number or email address! And if you're one of these sellers who only does business via email, answer your frickin email. There's nothing more annoying that those who don't respond to their email or take 2 days to get any kind of response.

6. Do provide an asking price.

You would think this is a no brainer, but there's a Jeep ad currently running here in Phoenix that is asking only for offers. There is no asking price. The ads states that the owner had invested over $34,000 total in his Jeep. Prospective buyers are left to guess on a price and nobody wants to play a guessing and waiting game. His ad is still up over one month. Needless to say, I didn't provide an offer and told the guy good luck trying to sell his Jeep that way.

7. Don't list your Salvage titled vehicle at or near Blue Book. 

This goes hand-in-hand with #2. I get tired of morons with Salvage or Rebuilt titled cars trying to get $1000 below Blue Book claiming it's a great deal. IT'S NOT! According to Consumer Reports, cars with Salvage or Rebuilt titles are worth 50% of Blue Book and sometimes less. Unless you're mechanically inclined and plan on keeping the car forever, I would stay away from vehicles with Salvage and Rebuilt titles. There's simply no way of knowing with complete certainty what damage was done to them. Insuring them can also be a royal pain.

8. Don't lie or be misleading about problems with your vehicle.

If there are problems with the car, state them in your ad. People appreciate honesty. One Jeep I recently looked at had body damage that wasn't stated anywhere in the ad or in the photographs that were posted (unbelievably, the condition of this Jeep was listed as excellent in the ad). If I knew about this damage ahead of time I wouldn't have wasted two hours of driving time and gas to go out and look at it. Right then and there I knew this wasn't a guy who I trusted or wanted to do business with.

9. Don't sell your vehicle out from another buyer.

I hear about this happening all the time. Sure, first come, first served applies, but be considerate to those who may be traveling a long way to buy your item. This situation was presented to me several years ago when I was selling a KZ Frontier travel trailer to a guy from Salt Lake City, a 650 mile drive. While he was on his way to Phoenix, I had another guy in New Mexico offer me $500 dollars more if I would sell it to him. Needless to say, I told the guy, no, and that I wasn't going to screw the other guy over. 

10. Don't leave your Craigslist ad online after you've sold your vehicle.

There's nothing more irritating than finding out the vehicle that you got excited about was actually sold. It only takes a few seconds and a couple clicks to delete your ad. Enough said.

Those are my 10 dos and don'ts for selling a car or truck on Craigslist. What are your thoughts? Do you agree or disagree with anything I said in this list? Let me know.

Rancho Steering Stabilizer Upgrade

$
0
0
With the recent purchase of a 1998 Jeep Wrangler with 106,000 miles, swapping out the old OEM components that are prone to wearing out from age and use like shocks, fan belts, and hoses will be important. A recent drive on the highway revealed a slight wobble at 59 mph. The wobble always appeared at this speed. When I slowed down the wobble went away; when I increased the speed the wobble remained. Now this wobble wasn't as severe as the dreaded death wobble that is so common with Jeeps, but it was bad enough for me to take notice. Fortunately, the fix for a slight highway speed wobble is easy and most of the time requires you to simply balance your tires. This was the case for me.

After this wobble incident, I parked my Jeep in the garage and took a close look at the steering components. This was something I wanted to do anyway, but this wobble issue gave me extra incentive. Fortunately, the front track bar, steering, and control arm bushings were all good, but I did discover that the original steering stabilizer was pretty shot and offered little resistance. I looked at several makes of stabilizers but decided to go with the Rancho due to its good reviews.

The installation of a steering stabilizer is pretty straight forward. It's easy to reach and there are only two bolts and nuts that need to be removed. Unfortunately, what often looks easy, isn't always the case with a 17-year-old truck. The bolt attached to the control arm was completely seized and couldn't be removed. After a couple hours of whacking and cussing with a hammer and breaking a pitman arm puller, I had to resort to a torch to heat it up so it could be removed. I didn't know it at the time, but a seized steering stabilizer is a pretty common problem with Jeeps.  I found numerous YouTube videos and threads on Jeep Forums about this issue.

Anyhow, the pics show the new stabilizer. The difference between the OEM stabilizer and the new Rancho stablizer is pretty dramatic. It looks much better, too!

Closeup of the Rancho Steering Stabilizer


Stock Interiors Carpet Kit Installation and Review

$
0
0
What is the nastiest project that everyone who is restoring a car or truck will have to do at some point in time? If you said, replacing the carpet. You are correct. The job is filthy, smelly, and often very time consuming. So there was a little reluctance and trepidation when I placed an order with Stock Interiors for a new carpet kit for my 1998 Jeep Wrangler.

Fortunately, installing new carpet in a Jeep Wrangler is pretty easy. Like the OEM carpet, the Stock Interiors carpet installs in six separate pieces rather than one large one (Jeep designers did this to allow quick removal before taking your Jeep into the mud). So having multiple pieces means an easy install--no need to remove the seats and center console (though you will have to loosen the bolts to the console so you can tuck the carpet underneath). For this job, you'll need to keep the old OEM carpet pieces to use as a template to help make any additional cuts to the new carpet. You'll also need to remove the old heat shields from the front two pieces since the new carpet doesn't include them.

For those wondering about the color of the new carpet, I couldn't find an exact match to the OEM blue-gray color, but Stock Interiors did offer a pretty close alternative, called "Steel Blue" (code 8935), that was a little darker and matched the OEM seats extremely well. Their website offers different piles, and of these I ordered their basic or entry level, "Plush Cut Pile." I did this because it's a Jeep and the carpet will get dirty/wet/muddy eventually, so I saw no need to waste money on a top-of-the-line carpet kit that would eventually get trashed. Total cost for my kit, without shipping, was $232.

To install the Stock Interiors carpet kit, you'll need several items. If you don't already have a pair, I highly recommend that you buy a sharp pair of scissors. It will make cutting the new carpet so much easier. You'll also need a roll of carpet seam tape or duct tape for the two small carpet seams around the rear roll bar on the wheel wells, a utility knife (box cutter) for making micro cuts, and a socket wrench with a 1/4 inch socket and two extenders to remove the hex screws holding the center console in place. You'll also need a can of spray adhesive to glue the old heat shields to the underside of the front pieces of carpet.

Before installing the carpet, I recommend that you clean and vacuum the floorboards. Doing this gave me an excellent opportunity to inspect the floorboard on my new Jeep. I was amazed at how good the rear floorboards and wheel wells looked--the paint and overall appearance of them looked like they came fresh from the factory. There wasn't a speck of rust anywhere. Only the front floorboards showed sign of wear and that was in the paint only, no rust. I used a good general purpose cleaner to remove any dirt I came across.

My carpet kit as it came from the UPS driver.
Wiping the floorboards before installing the new carpet.
You'll need the old carpet to use as a template for new cuts.

As I stated earlier, the installation was pretty easy. I installed the two wheel well pieces of carpet first followed by the large cargo bay piece. Due to the rounded shape, these two pieces didn't stay affixed to the wheel wells very well. Some like to use spray adhesive or carpet tape to hold the carpet in place around them, but I opted not to do this. With the rear seat in place and with the locking trunk installed, I found that the carpet didn't bulge or shift much at all. As for the cargo bay piece, I did have to go back and tweak on the eight tie down cuts two or three times in order to ensure proper alignment with all.

View of the passenger side wheel well.
View of the cargo bay.
Seam tape is needed for this small seam.

The only real issue I encountered during the entire installation was with the flat piece of carpet for the cargo bay. Stock Interiors made two diagonal cuts along the back edge for brackets that aren't found on the 1998 model of the Wrangler (see pic below). An email with pics to the Stock Interiors customer service department quickly alleviated this problem and within a week I had a new piece of carpet without these two cuts (I should add that having this extra "bad" piece of carpet allowed me to recover the top of my locking trunk unit so that the carpet matched the rest of the interior).

Original cargo bay piece with bad factory cuts.

The rest of the install was pretty straightforward with no complications. For the two front pieces you'll need to ensure that they're folded in half, with the carpet side up, when positioning in place as this makes the installation of the carpet much easier. You'll need to loosen the hex screws to the center console to install not only the two front pieces but also the rear floorboard piece. And don't forget to glue the two heat shields from the old carpet before installing them. Otherwise, the carpets will get scorched from the engine heat. For the driver's side carpet you'll also need to cut two small holes near the top for the supporting posts (these prevent the carpet from shifting and causing a hazard during driving).

Passenger side front carpet installed.
Driver's side carpet freshly installed.

Overall, this was a fun, easy, and very worthwhile project. The cost was reasonable and the end results were pretty impressive. The new carpet really freshens the appearance (and smell) of the interior and gets rid of 17 years worth of dirt, grime, lipstick stains, and who knows what else. The quality of the carpet kit was excellent with the molds, bends, and cuts for the most part very accurate--only minimal trimming was required during the installation. I wouldn't hesitate to use a Stock Interiors carpet kit again for another vehicle restoration.

Blog Title Change

$
0
0
Hello, everyone! You may or may not have noticed, but the title of this blog has been changed. The title has been changed from Mello Mike's Truck Camper Adventures to Mello Mike's Overland Adventures. I did this for two reasons. One, the new title more accurately conveys what this website is all about. I own a truck and camper and a Jeep Wrangler and will be traveling in both, so I didn't think the "truck camper adventures" part of the title was entirely accurate. Two, I changed the title of the blog to shorten things up. The previous title was simply too long.

Now, I want to assure everyone that the content and focus of this blog has not and will not change. This is still a website of my overland travels in and modifications to my 2011 Wolf Creek 850N solar-powered truck camper, my 2013 Ram 3500 4x4 Pickup Truck, and my 1998 Jeep Wrangler. Those who have followed this site from the beginning know that this isn't the first name change, and it probably won't be the last, yet the focus of this website has never really changed. That's the way it always has been and will it will always be.

In other developments, the wife and I will be taking off for another two week adventure which will include the 2015 Overland Expo in Flagstaff. Stay tuned for details of this trip. 

In addition, I will be holding another contest drawing giveaway for a big ticket item that every truck camper owner will love. Stay tuned for this announcement.

Bulldog Canyon 4x4 Jeep Trail, AZ

$
0
0
A couple days ago, we had an opportunity to explore the nearby Bulldog Canyon OHV trails in our newly acquired 1998 Jeep Wrangler. That morning I just had a set of Rancho RS5000X shocks installed on the Jeep and, wow, let me tell you they were badly needed. The shocks that were on it were the OEMs from 1998 and had 107,000 miles on them. As you'd expect, they were completely shot. It was a good thing that I had them installed. The Jeep got a very good workout on Bulldog Canyon's rough and rocky trails. 

The Bulldog Canyon OHV trails are located in the Tonto National Forest and is adjacent to the Apache Trail and the world famous Superstition Mountains. In this part of the Tonto National Forest you won't find any pine forests like you will around Payson, but you will find lots of Saguaro Cacti and natural desert beauty that can only be found in the Sonoran Desert. Access to Bulldog Canyon OHV area is by permit only through the Mesa District Ranger Office, but the process is quick and easy, and more importantly, free (the permit can be obtained either online or in person). The six-month permit you receive includes combinations to each of the six access gates locks.

The Bulldog Canyon OHV area consists of six forest roads, FR-10, FR-1356, FR-3512, FR-3554, FR-3556, and FR-12. Our plan was to start at the so-called Cottonwood entrance to FR-1356 off the Apache Trail, but we found a key lock on the gate not a combo lock. The Ranger Office was surprised as much as we were when we told them that on the cell phone and recommended that we try another gate. We decided to try the nearby FR-12, an isolated, 4-mile long trail not connected to the main trail system, but this was a mistake. We found the trail poorly marked and slow going. After snapping a few scenic pics, we decided to turn around and drive the main Bulldog Canyon route, FR-10, which is a part of the newly christened Great Western Trail, a trail system connecting several states in the Western U.S. 

At first, we headed toward the Wolverine south entrance to FR-10, but we couldn't find it (we later learned we were close, real close). I'm including the directions here so others can find the gate quickly without trouble. The Wolverine gate is located in the city of Apache Junction. From Mesa head east on the Superstition Freeway (US 60) and take the Idaho St exit. Follow Idaho St. north 4.5 miles to McKellips Rd. Turn right on McKellips and travel half a mile to the Wolverine Pass Rd. then turn left. Follow Wolverine Pass Rd. for 7/8 mile and then turn right on Tonto Rd. Travel north on Tonto Rd. for a quarter mile to Cactus and turn left. Follow Cactus to McDowell Road and follow it to the FR-10 gate.

A key lock was on the Cottonwood gate so we couldn't enter.
So instead we started on nearby FR12.
Stunning scenery near the start of FR-12.
After snapping a few scenic pics we decided to turn around.
Kiosk at the north entrance to FR-10.
Near the north entrance of FR-10 heading south.
This part of the trail was very smooth and easy going.
The scenery in the Goldfield Mountains was stunning.
Another view of the Goldfields.
View of FR-10 heading south.
Parts of the trail were very rocky. This part wasn't that bad.
A smooth stretch approaching Bulldog Canyon.
This rocky part of the trail was much worse than it looks.
Flowering Sagauro with its arms held high.
Another view of the trail.
View of Four Peaks Mountain to the northeast.
The end of FR-10 at the Wolverine Gate.

The length of FR-10 is approximately eight miles long and took us about 90 minutes to drive with a few short stops. The trail at times is very rocky and slow going. For the most part, we drove the entire route in 1st gear and had to use 4-wheel drive during a couple steep and rocky stretches. There are, however, parts of the trail that are level and smooth, especially at the south and north ends of FR-10. There you can find several pull-offs were you can boondock for the night. In fact, during our drive, we passed a couple Class B van conversions which had set-up camp. Can an RV tackle this Jeep trail? For the most part, no. I wouldn't try this in my 4x4 truck camper, but I would if I owned a small 4x4 pop-up truck camper or a Sportsmobile Van.

Mello Mike's Truck Camper Departure Checklist

$
0
0
I'm sure we've all done it at one time or another. You've loaded up the camper for what you hope is an unforgettable trip. You get on the road and are heading toward your destination when your wife realizes that you've forgotten to bring along several important items. These brain farts can either be an annoyance, like forgetting to extend the towing mirrors, or can be important, like forgetting to bring along vital medication. In an effort to prevent brain farts like these from happening, this truck camper departure checklist has been prepared. The checklist items are presented both in this article and in PDF file form (note that you'll have to open an OpenDrive account to access the PDF version of the checklist). As always, your feedback is welcome and encouraged. If there's anything I forgot or that you think I should add to the checklist, please let me know.

I. Departure

  • Fuel-up Truck
  • Fill DEF tank (if applicable)
  • Move License Plate from Truck to Camper
  • Load Camper on Truck
  • Connect 6-pin umbilical
  • Install Tie Downs and Turnbuckles
  • Check Tire Pressures
  • Fill Fresh Water Tank
  • Fill Propane Tanks
  • Turn-on Refrigerator (2 days prior)
  • Hitch-up Jeep/Boat/Trailer (if applicable)
  • Close all windows and vents 
  • Storage compartments and doors secure for travel 
  • Antennas/Wind Turbine secure for travel (if applicable)
  • Bring-in Slideout(s) (if applicable)
  • Truck Camper Jacks Retracted
  • Extend Truck's Towing Mirrors
  • Reset Truck's Trip Odometer
  • Adjust Shock Absorber Dampening (if applicable)
  • Switch Refrigerator to Propane
II. Equipment and Tools
  • Smartphones and Charger Cords
  • Portable Handheld Radios and Charger
  • Portable Generator (if applicable)
  • Wind Turbine (if applicable)
  • Saw Zaw or Chain Saw
  • Folding Shovel
  • Tool Bag
  • Portable Air Compressor
  • Winch Bag (if applicable)
  • Leveling Blocks
  • First Aid Kit
  • Emergency Roadside Kit
  • Binoculars
  • Electric Fan (12v)
  • His and Her RV Keys
III. Camping Items
  • Bug Repellent
  • Sunscreen
  • Hats
  • Hiking Packs
  • Bedding (Sheets and Blankets)
  • Sleeping Bags
  • Folding Chairs
  • Propane Grill
  • Folding Table
  • Solar Lantern
  • Solar Flashlights
  • Firewood
  • RV Toilet Paper
  • RV Holding Tank Treatment
  • Games/Cards
  • Personal Protection
IV. Clothing
  • Cold Weather Clothes
  • Warm Weather Clothes
  • Pajamas
  • Winter Socks
  • Undergarments
  • Hats
  • Shoes/Boots
  • Hiking Shoes
  • Coats
  • Sunglasses
  • Slippers
  • Swimwear
V. Personal Items and Hygiene
  • Medications
  • Vitamins
  • Feminine Products
  • Towels
  • Wash Cloths
  • Toothpaste and Toothbrushes
  • Shaving Kit
  • Hair Care Items and Products
  • Antiperspirants
  • Lip Balm
  • Soap
  • Shampoo and Conditioner
  • Skincare Lotion
  • Tissue Paper
VI. Food and Kitchen
  • Buy Groceries
  • Condiments
  • Seasoning
  • Drinking Water
  • Paper Plates
  • Plastic Cups
  • Plastic Bowls
  • Cocoa/Coffee Mugs
  • Silverware
  • Can Opener
  • Aluminum Foil
  • Garbage Bags
  • Paper Towels
  • Cooking Pots/Skillet

Hello From Sedona, AZ

$
0
0
 Well, the wife and I finally got away on Monday after a two-day delay due to a freak snowstorm that hit Northern Arizona last weekend. We decided to hit Sedona for 3-4 days before heading out to Mormon Lake to attend the 2015 Overland Expo. Here in Sedona we've driven several trails, visited some Indian ruins, and taken loads of pics. For the nights we've boondocked twice and stayed in a USFS campground once. The weather has been terrific, in the 70s, and food terrific. I'll provide a more detailed trip report later, but I wanted to post a few pics to show everyone what we've been up to.


Report of the 2015 Overland Expo

$
0
0
Yesterday marked the last day of the 2015 Overland Expo - West at Mormon Lake, AZ. Since I first attended the Overland Expo in 2013, I've been hooked and now look forward to this annual event every year. Event organizers call the Overland Expo "the world's most unique event for do-it-yourself adventure travel enthusiasts" and it is. The Expo offers hundreds of session-hours of classes for 4x4 enthusiasts, roundtable discussions, demos, food, and a large exposition featuring over 150 vendors of adventure travel equipment, camping gear, bikes, vehicles, and services. Basically, the Overland Expo is nirvana for travel and off-road adventure geeks like me.

Unfortunately, the 2015 Overland Expo started out as a big flop, not due to anything the event organizers did, but because of the weather. Like the weekend before, a freak rain and snow storm hit Northern Arizona on Friday and Saturday which left the event grounds on Mormon Lake a slick and muddy mess. Like previous years we camped onsite. This is usually a bright spot and part of the big appeal of attending the Expo as you get to rub elbows with fellow overland enthusiasts and look at their rigs. However, the sticky mud and clay and pools of water made getting around very difficult. After being hunkered down all day Friday during the storm we decided to relocate early Saturday morning before things got worse, but we got stuck. Having 4-wheel drive didn't help. Fortunately, my newly installed Warn 16.5ti Thermometric Winch bailed us out with the help of a Good Samaritan who's truck acted as an anchor point for our winch.

As I mentioned, the Overland Expo offers numerous classes, one of which is a class on winch operations. I didn't get to attend the class, but I did get first-hand experience in winching in a real life situation from others who have more experience in winching than I. Thanks to those who were on-hand to provide some guidance and help. 

Anyhow, after boondocking in the nearby Coconino National Forest on Saturday, we returned on Sunday, the last day of the event. Fortunately, the weather had cleared with temps in the low 60s. We met lots of great folks and were able to take pics of some of the best and most noteworthy 4x4 vehicles. Of those who attended to show, by far the most popular vehicle was the JK Jeep Wrangler Unlimited with the Toyota FJ Cruiser a distant second. The pics below show how bad the weather was at the beginning--we awoke to snow on Saturday morning. The pics also gives you a better idea of what the Overland Expo is all about.

The muddy mess of the camping area Saturday morning.
Yours truly winching out with my new Warn 16.5ti winch.
Joni and Mike Nomadacy's Hallmark Camper and Ram 2500.
A view of Howling Moon's roof-top tent.
JK Wrangler with a Maggiolina pop-top, roof-top tent.
Chad Schroll of Warn with his display of winches.
Decked-out Land Rover by High Trail Expeditions.
This rig, "The Cocky," came all the way from Australia.
View of, The Long Ranger, Motorwork's 3-Axle JK.
A sweet Phoenix Pop-Up Camper design on a semi-truck.
This JK Unlimited, by Barlow Adventures, caught my eye.
Jeep had a prominent role at this year's event.
Cari and Robby Rowe's Phoenix Camper and Fuso Combo.
Cari and Robby Rowe, owners of Phoenix Pop Up Campers.
 Closeup of a Voyager teardrop trailer.
One of several avenues at the Overland Expo.
New 3.0L diesel Jeep Grand Cherokee with Warn winch.
View of the new JK trimline with new graphics.
Global Expedition Vehicle's Turtle Expedition Unlimited.
Rig on the obstacle course.


Giving Your RV Refrigerator a Boost

$
0
0
As most RV owners know, RV absorption refrigerators can sometimes be very finicky. One common problem is poor performance on summer days when ambient temperatures are high (90 degrees and higher). Not long ago, my little two-way, 2.7 cu Norcold refrigerator was having a difficult time keeping up with the 90 degree temps. Fortunately, solving this problem was fairly simple. All I needed to do was flip the switch to a specially installed 12 volt mini fan to provide some much needed air flow behind the refrigerator. 

Why is a mini fan needed and how does it work? Well, the heat source for the refrigerator--either the propane flame or the electrical heating element--is used to "elevate" the ammonia/water mixture up to the top of the refrigerator's cooling unit. Once the mixture is there gravity and a chemical reaction begins and cooling is accomplished. Air flow is needed to dissipate the heat collected on the refrigerator's evaporator fins and from the refrigerator's cooling unit. A 12 volt fan helps to accomplish this by circulating the cooler fresh air received from the side vent and across these fins. 

Mini fans can be purchased at any RV parts store or on any online computer repair store. You can buy mini fans that are either battery operated or come with 12 volt power leads to tie into your RV's 12 volt system. I went the latter route. Connecting the fan to the power source was the easy part, the more difficult problem was finding a place to attach the mounting bracket. There was no place. After looking at all the options, I decided to screw a small block of wood to the floor. You can see in the picture below how I was able to attach the bracket to it. Pretty simple! Oh, a quick note. When you install the fan ensure it's facing the right direction and pushes air up when you install it on the motor. I've come across some guys on the Open Roads Forum who installed their fans backwards and wondered why no cooling was taking place.


I installed my fan three years ago and this has been, without a doubt, one of the most important mods I've made to my camper. The fan significantly improves the cooling of the refrigerator and does so well at times I have to turn the refrigerator down to prevent freezing. So if your refrigerator isn't cooling well when it's hot you might want to give this modification a try. It's cheap and easy and well worth the time and effort to install.

Trip to Lake Powell and the Grand Staircase

$
0
0
Sunday, we returned from our two-week getaway in the truck and camper. If you've been following along, you know our first stop was in Sedona followed by the 2015 Overland Expo at Mormon Lake. After the Expo, we stayed at the Ft. Tuthill Military Campground in Flagstaff for a couple days where we did some laundry, dumped our holding tanks, filled up the fresh water tank, and took some time to repair a leaky toilet. After that, we were off to Grand Staircase-Escalante National Monument (GSENM) and the Glen Canyon Recreation Area to explore the Smoky Mountain Road and other locations.

First, we decided to boondock overnight at a sweet location a good friend told us about last year. The location is secret, but I can tell you it's along river in the Grand Staircase. Anyhow, after a restful night sleep at this sweet location, we got up to start exploring the Smoky Mountain Trail. This road actually traverses both the Glen Canyon Rec Area and in the GSENM. In Glen Canyon, the Smoky Mountain Trail is designated FR-230 and begins in the small town of Big Water, UT. To find the road look for Ethan Allen Road off of US-89 and turn north, the Smoky Mountain Trail splits off from it. The first five miles of the Smoky Mountain Trail is paved and after passing through a huge wash the road rises and soon turns into a well-graded dirt surface. This first part of the drive is called the Moon and if you saw it you would know why. Here the rock formations are dark gray and are largely barren of any color or vegetation. Still, the eerie landscape is beautiful in its own right and isn't something you see everyday.

About 13 miles up the Rocky Mountain Trail we came to FR-231 which leads to Warm Creek Bay. We knew nothing about this access point to Lake Powell, so we decided to explore it and have lunch. This turned out to be one of the best decisions we made during the entire trip because FR-231 passes through Crosby Canyon, a spectacular, multicolored slot canyon. This was our first visit to Lake Powell and it didn't disappoint. We arrived at Warm Creek Bay on a Wednesday and apparently that was a good thing because we had the entire bay to ourselves. Because of this and because the setting was so beautiful, we decided to boondock and stay for the night. While setting up camp, we noticed that the catfish were jumping, so after resting and a good meal, I decided to break out the fishing pole and tackle to see if I could catch one. It didn't take long. 

After a peaceful and wonderful overnight stay at Warm Creek Bay, we hit the Smoky Mountain Trail with Escalante, UT our destination for the night. With cloud cover overhead and rain in the forecast for the following day, we didn't have the time to explore the route like I wanted, so we had to take the entire 78-mile-long road in one day. Designated BLM Road 300 within the GSENM, this scenic backway was sometimes thrilling, often rough, but always beautiful. Of all the trails in the Grand Staircase, the Smoky Mountain Trail is, by far, the roughest, longest, and most remote. This isn't a trail for the faint of heart. To get out of the Glen Canyon Rec Area, the road climbs the Kelly Grade, a 1,000 ft steep grade with numerous switchbacks and steep drop offs. The views along this stretch are spectacular including a distant view of Page and Lake Powell to the south. Apparently, several movies were filmed in this area, including “Planet of the Apes.”

After this initial hair-raising ascent, we decided to take a break and have lunch. At the top, the Smoky Mountain Trail levels out atop the Kaiparowits Plateau at an elevation of 7,000 ft. Here the road is a smooth, sandy surface and the pace fast, but after about 10 miles this changes abruptly as the remainder of the route passes over and through several rocky canyons. The pace in these rocky canyons is much, much slower, but the scenery is better. The trail along this part of the drive features numerous peaks and valleys with the low points in most cases going through boulder strewn washes. Because of this I wouldn't recommend a passenger car for this route, especially soon after a rain, a 4x4 vehicle would be the safest bet to drive this road. Five hours and 68-miles later, we reached Escalante exhausted yet feeling good about exploring this little-known trail in the Grand Staircase. 

Boondocking in the Grand Staircase before heading out.
This sign marks the beginning of Smoky Mountain Trail.
Passing large boulders near the start of the Smoky Mt. Trail.
Moon landscape on the Smoky Mountain Trail.
Approaching the Warm Creek Bay turnoff.
Here the Crosby Canyon got very narrow with an overhang.
First view of Warm Creek Bay via Crosby Canyon.
Our prime boondocking location at Warm Creek Bay.
"The catfish are jumpin and I'm going to catch me one."
After about 20 minutes, I got one!
Karen snapped this spectacular pic at dusk.
With overcast skies the next morning, we decided to head out.
Smoky Mountain Trail soon after leaving Crosby Canyon.

Climbing the Kelly Grade switchbacks.
View half-way up the Kelly Grade.
Stunning view of Page and Lake Powell from the top.
It was smooth going along the Kaiparowits Plateau.
Then things got rough.
But the scenery was beautiful.
At the junction of the Left Hand Collet Canyon trail.
One of the many steep and rocky climbs.
We decided to pass on highly regarded drive (for now).
Boondocking near the end of the road near Escalante.

Would I recommend the Smoky Mountain Trail? Absolutely, but I would recommend taking in the entire trail over a course of two or three days rather than one like we did. The trail is rough is many locations and because of this the pace is slow, but the scenery is worth the time and effort. If you're looking for a quick and relaxing scenic backway off of Utah Route-12, skip this drive and take the Hell's Backbone or the paved portion of the Burr Trail instead. But if you're looking for adventure in a lightly traveled, less-known road where the boondocking is spectacular, then the Smoky Mountain Trail is for you

1,000,000 Page Views! A BIG Thanks!

$
0
0
This website and blog reached another huge milestone today by registering 1,000,000 page views! Yahoo!!

I wanted to take this time to say, thank you, to you my readers. I simply couldn't have done it without you. Sure, I'm responsible for the content of this website, but without readers it means nothing. I especially appreciate the reader feedback in the form of comments and emails. The purpose of this website and blog is to inform and inspire and I hope that it does both. Indeed, I've had individuals over the years who've inspired me. I wouldn't be here if it wasn't for them. Likewise, I wouldn't be here if it wasn't for those who follow.

I also want to say thanks to Blogger for hosting this website, to my sponsors, both past and present, and to those readers who purchase items through Amazon.com on this website. In celebration for this important achievement, I'll be hosting a big giveaway. Truck camper owners will love this one. Be on the lookout for the announcement. Until then, see you on the road.  

Fixing a Leaking RV Toilet

$
0
0
RV ownership certainly has its pros and cons. One con of RV ownership is maintenance with toilet and black tank repairs being, perhaps, the biggest and smelliest con of all. As you know, RV repairs can get expensive with the shop rates varying between $75 and $129 an hour. Fortunately, many RV repairs are simple and can be done by anybody who is handy with tools and who possesses a little common sense. One such repair is a leaky toilet. I recently had to make this repair and I'm going to show you how quick and easy (and cheap) it is to do.

First you need to determine the source of the leak. Does it leak all the time or simply when you flush? If it leaks only when you flush it's usually one of two things, a bad water module assembly or a loose fresh water connection to the toilet. Obviously, you'll first want to make sure the water connection is good and tight. Over time, vibrations and temperature variations can loosen it so check this first. Unfortunately, this is easier said than done. Often, the amount of room behind a toilet where the connection is located is very limited. The solution to this is a small mirror and a basin wrench. Pictured below, the basin wrench allows you to tighten a horizontal plumbing connection quickly and easily when space is limited.

If the water connection is good and tight and you still have a leak, then the likely source of that leak is a bad water module (this was the case for me). This part is plastic and like all plastic has a tendency to become brittle due to age and heat. You can buy a repair kit, which includes a new water module and a new toilet seal, for around $22 on Amazon.com. For my Thetford Aqua-Magic V, I purchased the Thetford 31705 Water Module Kit. If you don't have the time to order this kit through the mail, you'll have to buy it at a RV parts store like I did. I paid $41 at an RV parts store in Flagstaff. Ouch!

Like any job, you need the right tools to complete it. The most important tool you need for this job is the aforementioned basin wrench. Most people don't have one of these in their tool box so if you have a family member or friend who has one, borrow it. Otherwise, you need to buy one like the Tekton 12-Inch Basin Wrench. For this job, you'll also need a Phillips screwdriver, a 1/4" wrench, and a couple rags.

To repair the leak you'll first need to shut the water off and drain the toilet. Next, remove the two nuts connecting the toilet to the floor. Then disconnect the fresh water line flair-it fitting from the toilet using the aforementioned basin wrench. After the fresh water line is disconnected, you can remove the toilet (make sure you have a rag ready to wedge into the hole to keep the odors out).

A basin wrench is an essential tool for this repair.
Bathroom floor with toilet removed.

Replacing the old water module with the new one is very easy and can be done in 10 minutes. First, flip the toilet upside down so you can work on it. Remove the retaining screw with a Phillips screw driver then pull and twist the flush tube off the hose barb of the water module. Next, lift the water module locking tab to release the water module from the toilet, then pull the module out of the groove. Angle the water module to disconnect the wire link from the lever arm hole. That's all you need to do to remove the water module. Reverse the steps to install the new one.

Newly installed water module.

The water module kit you ordered also includes a new closet flange or toilet seal. Even if the old seal looks good, it's a good idea to remove it and install the new one. Seals become stiff and brittle over time and replacing it with a fresh seal just makes sense and can prevent another potential source for leaks in the future. It only takes a few seconds to install the new one.

Once the new seal is installed, remove the rag keeping the tank odors out of your RV. Then reinstall the toilet using the original nuts (note, that the toilet will sit about an inch high before the nuts are tightened. This is normal as the new seal is holding the toilet up. After the new nuts are installed, the toilet will seal and sit flush with the floor). After the toilet is remounted to the floor, reconnect the fresh water line flair-it fitting to the toilet. Flush test the toilet and check for leaks. Now you're done.

As you can see, fixing a leaking toilet isn't rocket science. Anyone can do if you have the will, a little know how, and common sense. This repair took me 30 minutes, including clean up, and saved me big bucks. The money I saved can be used on other things like a new pair of hiking shoes, a new fishing pole and tackle, or a night on the town with the wife.
Viewing all 66 articles
Browse latest View live